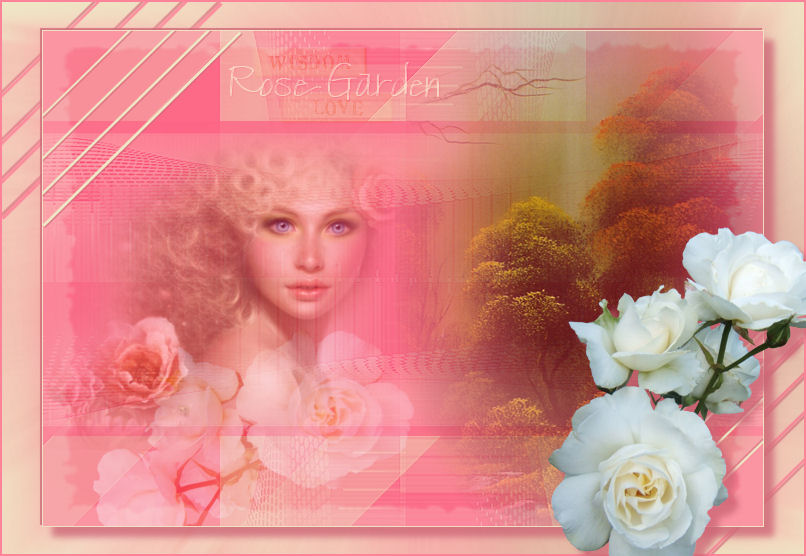
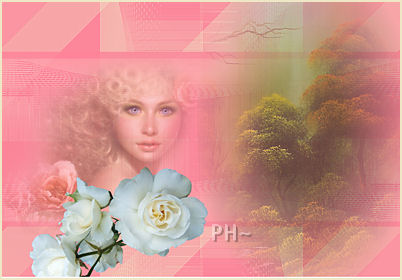
Rose Garden
Filters Required:
Simple
Filters Unlimited 2.0 - Square Edges
If you need a filter..select the linked image below.
Filters
------------------------
Tubes Required:
Main Tube by Yokalishis
Tube and Mask by Psppeg
Yoka provides psppeg with permission to use the tubes provided in this tutorial.
Many Thanks!
------------------------
Materials
------------------------
|
Preparation:
Look thru the list of filters and make certain you have them.
Open all tubes and mask in your psp program and minimize.
Place Selection File in selection folder
------------------------
Colours
Material Palette - Set foreground to #fd8399 and background to #eee6c5
or select two very different colours from each other, preferably a light and a bright medium.
Lets Begin:
A)Background
1)File, New Image, 800 w x 550 h, transparent
2)Flood Fill with Foreground Colour
3)Layers - New Raster Layer
4)Flood Fill with background colour
5)Layers - New Mask Layer - From Image - Mask: mask_rose_psppeg

6)Layers - Merge - Merge Group
7)Layers - Duplicate
8)Layer Palette - Turn off visability of top layer, select middle layer

9)Layers - Merge - Merge Down
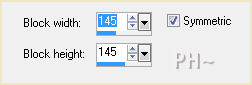
10)Effects - Distortion Effects - Pixelate
11)Effects - Edge Effects - Enhance
12)Effects - Plugins - Simple - Top Left Mirror
13)Effects - Plugins - Simple - Diamonds
14)Layer Palette - Turn on Visability of top Layer and Select
15)Image - Free Rotate - Left, 90%, all layers unchecked
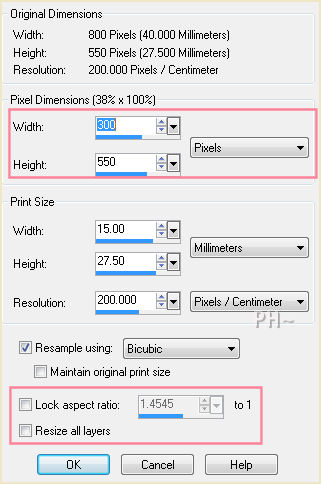
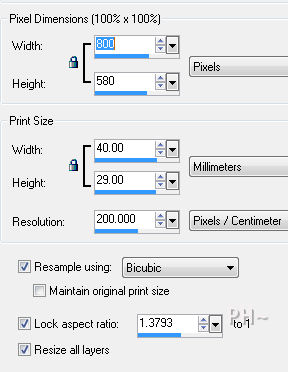
16)Image - Resize - notice the pink rectangles
17)Effects - Image Effects - Offset - Horizontal: 350, Vertical: 0, transparent
18)Layers - Duplicate
Image - Mirror - Flip
19)Layers - Merge - Merge Down
20)Layer Palette - Opacity: 75
B)Second Background Layer
1)Layers - New Raster Layer
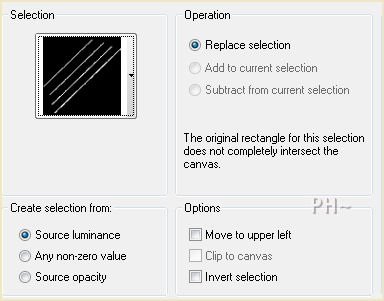
2)Selection Tool - Custom Selection

3)Flood Fill with Foreground Colour
4)Selections - Select None
5)Layer Palette - Opacity: 80
6)Layer Palette - Select Middle Layer
7)Layers - Duplicate
8)Layers - Arrange - Bring to Top
9)Image - Free Rotate - Same Settings
10)Image - Resize 80%, all Layers unchecked
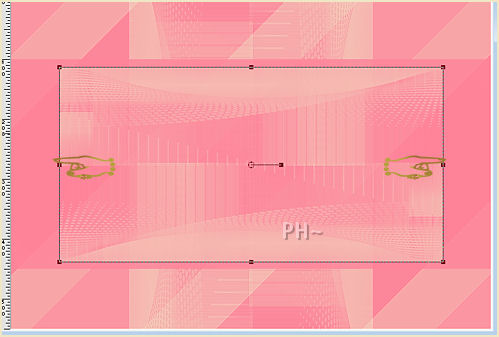
11)Deformation Tool - Slide Left and Right sides to edge of image on both sides
12)Layer Palette - Blend Mode: Soft Light
c)Accent Tube 1
1)Maximize Yoka-Misted-Faces-Pink-23052012.psp - Edit - Copy - Close image - Edit - Paste As a New Layer.
2)Image - Resize - 80%, all layers unchecked.
3)Mover Tool - Move tube to the left
4)Layer Palette - Opacity: 60
D)Accent Tube 2
1)Maximize scenerytube_bypsppeg.psp - Edit - Copy - Close image - Edit - Paste As a New Layer.
2)Mover Tool - Move tube to the right
4)Layer Palette - Opacity: 70
E)Main Tube
1)Maximize 2012_05_SL.psp - Edit - Copy - Minimize image - Edit - Paste As a New Layer.
2)Image - Resize - 25%, all layers unchecked.
3)Image - Free Rotate - Right - 90%, all Layers Unchecked
4)Image - Mirror
5)Mover Tool - Position below Yoka's girl tube
6)Layer Palette - Blend Mode: Soft Light
F)OverLay
1)Layers - New Raster Layer
2)Flood Fill with Foreground Colour
3)Effects - Plugins - Filters Unlimited - Edges, Square - Square Edge - 04
4)Selections - Select All - Select - Float - Select - Modify - Contract 3 pixels
5)Selections - Invert - Hit Delete Key
6)Selections - Select None
7)Adjust - Sharpen - Sharpen More
8)Layer Palette - Blend Mode: Burn, Opacity: 40
9)Layers - Merge - Merge All
G)Accent Element
1)Layers - New Raster Layer
2)Selections - Load/Save Selections - Load psppeg_roseg1.sel
3)Flood Fill with Background Colour
4)Selections - Select None
5)Effects - 3D Effects - Drop Shadow - 1, 1, 80, 1, colour: #cd6776
6)Layers - Duplicate
7)Image - Mirror - Flip
H)Framing
1)Layers - Merge - Merge All
2)Image - Add Borders - 1 pixels symmetric border - with background colour
3)Layers - Promote Background to Layer
4)Image - Resize 90%, all layers unchecked
5)Layers - New Raster Layer
6)Layers - Arrange - Send to Bottom
7)Flood Fill - Background Colour
8)Layer Palette - Select Top Layer
9)Magic Wand Tool - Feather and Tolerance 0, Select Outer Border
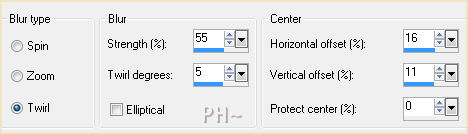
10)Adjust - Blur - Radial Blur
11)Selections - Invert
12)Effects - 3D Effects - Drop Shadow - 10, 10, 80, 10, same colour
13)Effects - 3D Effects - Drop Shadow - minus 2, minus 2, 80, 1, same colour
14)Selections - Select None
15)Layer Palette - Select Bottom Layer
16)Selections - Load/Save Selections - Load: psppeg_roseg1.sel
17)Layer - New Raster Layer
18)Flood Fill Foreground Colour
19)Layers - Duplicate
20)Image - Mirror - Flip
J)Main Tube
1)Maximize 2012_05_SL.psp - Edit - Copy - Close image - Edit - Paste As a New Layer.
2)Image - Resize - 25%, all layers unchecked.
3)Mover Tool - Position: Bottom Right Corner
4)Effects - 3D Effects - Drop Shadow - Same Settings
5)Image - Add Borders - 2 pixel symmetric border in Foreground Colour
K)Finalizing
1)Add your watermark
2)Add text
3)Layers - Merge - Merge All Flatten.
4)Image - Resize 800 pixels.
Your done.
Another Example

Home
©PSPPEG 2011 - 2012
All Rights Reserved
Tutorial created May 26th 2012