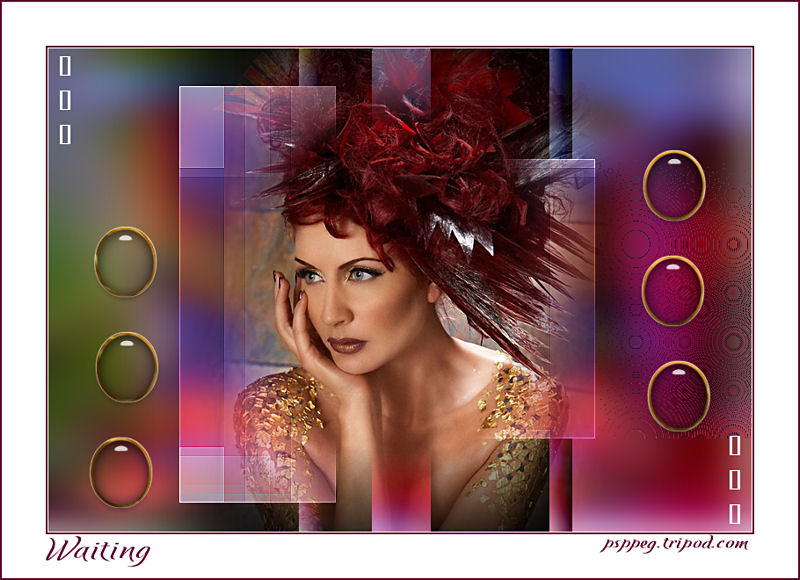
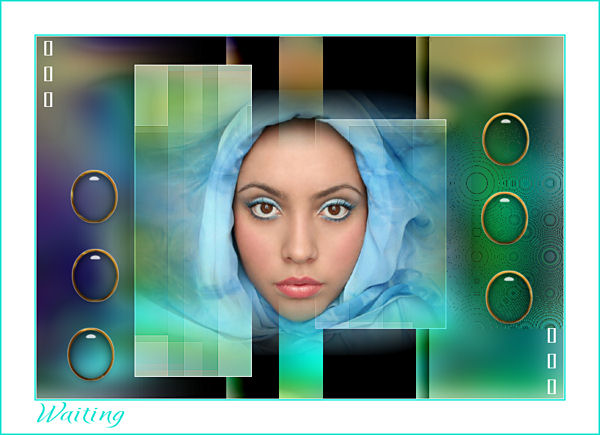
Waiting
Filters Required:
To find rare filters such as Sf10, scroll down to the bottom, click on Home, at the top of the page is a link for Rare Filters
Sf10 I - Blinds Vertical and Circulate
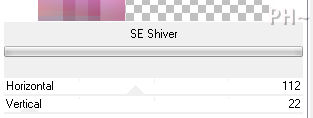
Sf10 III - SE Shiver
Eye Candy 5 - Impact - Glass and Chrome
Transparency - Eliminate White
------------------------
Tubes Required:
Main Tube Female
background
waiting_digits
------------------------
Materials
------------------------
|
Preparation:
Open all tubes in your psp program and minimize.
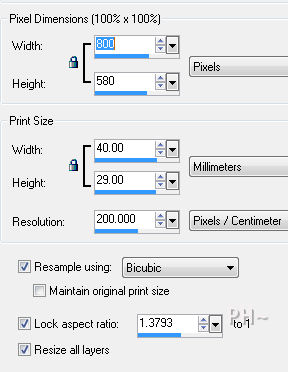
1)File, New Image, 800wx550h, transparent.
Selections - Select All
Maximize wa_psppeg_bkg.jpg - Edit - Copy - Close image - Edit - Paste Into Selection
Selections - Select None.
Layers - Duplicate, twice. 3 Background layers.
Layer Palette - Turn off visability on the top two layers.
2)Layers Palette - Select Bottom Layer.
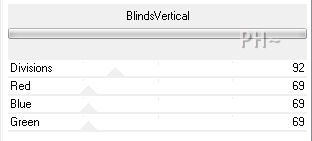
Effects - Plugins - Sf10 1 Blinds Vertical 92, 69, 69, 69.
3)Layer Palette - Turn on visability of middle background layer.
Select the middle layer.
Layers - New Mask From Layer - From Image - select mask wapsppeg_mask.
Only Source Luminance checked.

Effects - Edge Effects - Enhance.
Layers - Merge - Merge Group.
4)Layer Palette - Turn on visability of top background layer.
Select the top layer.
Selections - Load/Save Selections - Load Selection from Disk - Load psppeg_abs_thts1.sel
Source luminance, Replace selection checked.
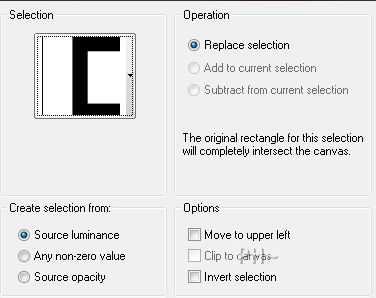
Selections - Invert. Hit Delete key on keyboard.
Selections - Invert.
Selections Tool - Selection - Rectangle.
Mode Remove, feather 0. Draw a rectangle around the square you created to the left, the larger square.
This removes the selection.

Selections - Promote Selection to Layer.
Selections - Select None.
5)Layer Palette - Top layer selected.
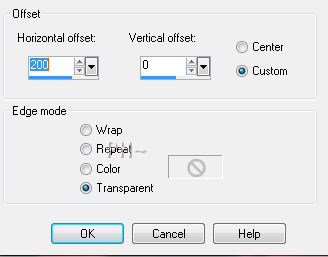
Effects - Image Effects - Offset - 200,0.
Effects - Plugins - Sf10 1 Cirquelate, default settings.
Color Palette - Turn off Visability on background color.
Effects - Plugins - Transparency - Eliminate White, default settings.
6)Layer Palette - Select 2nd to top layer.
Selections - Load/Save Selections - Load Selection from Disk - Load the same selection again.
Effects - Plugins - Sf10 III - SE Shiver - Settings:112, 22.
Selections - Select None.
Effects - Edge Effects - Enhance
7)Maximize redfeathers_psppeg.psp. Edit - Copy - Close tube - Edit - Paste as a New Layer.
8) Layers - Merge - Merge Visable.
Selections - Load/Save Selections - Load psppeg_abs_thts3.sel.
Selections - Promote Selections to Layer.
Effects - Plugins - Eye Candy 5 Impact - Glass - Settings: Setting Tab - Clear. Default settings.
Selections - Modify - Expand by 3 pixels.
Layers Palette - Select Bottom Layer.
Layers - New Raster Layer.
9)Flood fill each selection with white.
Effects - Plugins - Eye Candy 5 Impact - Chrome - Settings: Setting Tab - Gold. Default settings.
Adjust - Adjust - Brightness and Contrast - Brightness 28, Contrast 21.
Selections - Select None.
Layers - Merge - Merge All Flatten.
10)Maximize wapsppeg_deco.psp. Edit - Copy - Close tube - Edit - Paste as a New Layer.
Position top left corner.
Layers - Duplicate.
Image - Mirror. Image - Flip.
Layers - Merge - Merge All Flatten.
11)Image - Add Borders - Add a 1 pixel symmetric border in white.
Image - Add Borders - Add a 2 pixel symmetric border in #620631.
Image - Add Borders - Add a 50 pixel symmetric border in white.
Image - Add Borders - Add a 2 pixel symmetric border in #620631.
12)Add your watermark
Add text
Layers - Merge - Merge All Flatten.
Image - Resize 800 pixels.
Your done.
Another Example
Home
©PSPPEG 2011
All Rights Reserved