Ivy
Filters Required:
Simple
VM Extravaganza
AP01 Innovations
Toadies
------------------------
Tubes Required:
Main Tube Female
Misted Fruit and Flowers
Ivy
------------------------
or use the Ones Used Here
------------------------
Which include:
woman_196_tubed_by_thafs which was found at the group Flower Power Partage TubesLink is Here
ivmist_psppeg
Noshay_DWM_E154 by Noshay Designs Found Here
|
Preparation:
Open all tubes in your psp program and minimize.
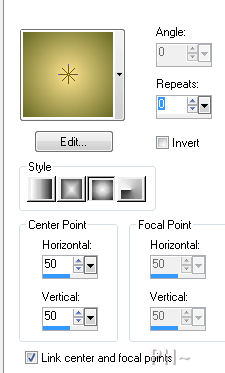
Select two colors from your main tube. We used #fde48f foreground,#656824 background.
Set your foreground to gradient, foreground/background, Angle 0, Repeat 0, Style Sunburst Horizontal and Vertical 50.
File, New Image, 800wx600h, transparent.
Flood Fill with Gradient
Lets Begin:
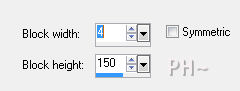
1) Effects-Distortions-Pixelate 4,150
Layers-New Raster Layer. Selections-Load Selections - Load psppeg_iv1. Flood Fill with Gradient. Select none.
Effects - Edge Effects - Enhance.
Effects - Plugin Effects - Toadies - Sucking Toad Bevel 1 26,183,201

Effects - Plugins - Toadies - What Are You? - default settings 20,20 Repeat.
2) Layer Palette - Select Bottom Layer - Layers - Duplicate.
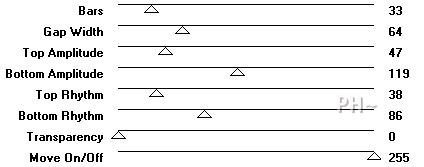
Plugins - VM Extravaganza - shoutin! - settings 33, 64, 47, 119, 38, 86, 0, 255
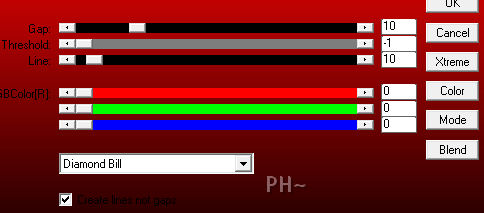
Plugins - AP 01 Innovations - Lines, Silver Lining. Settings Open the drop down bar and Select Diamond Bill.
Layer Palette - Change the Blend Mode to Multiply and the Opacity to 70.
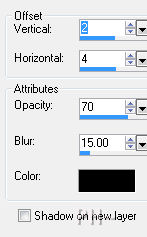
Effects- 3D Effects - Drop Shadow. Settings 2,4,70,15.00 color Black #000000.
3)Layer Palette - Select Top Layer.
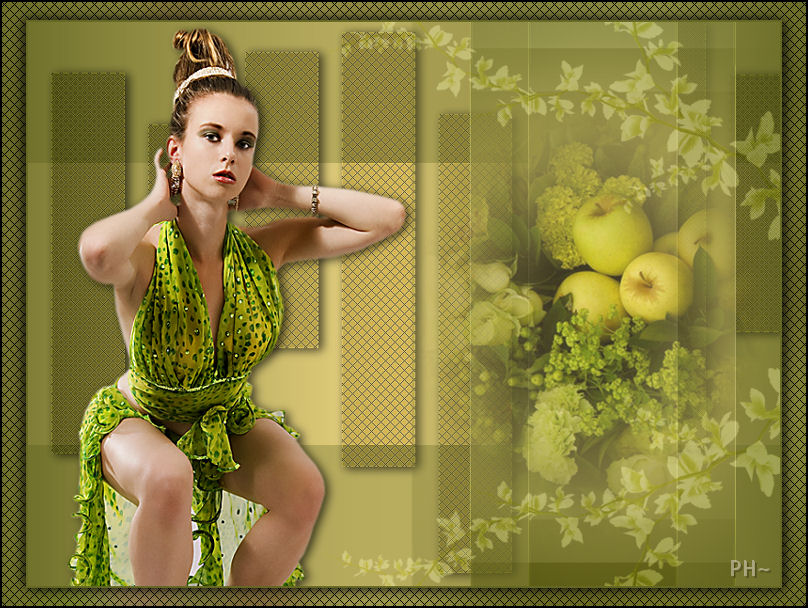
Maximize ivmist_psppeg.psp, Edit - Copy. Close tube. Edit - Paste - as a New Layer.
Image - Resize 75%, All Layers unchecked.

Position over the first Vertical bar to the right, in the center.

Layer Palette - Lower the Opacity to 75.
4)Maximize Noshay_DWM_E154, Edit - Copy. Close tube. Edit - Paste - as a New Layer.
Image Resize 75%, All Layers Unchecked same settings as above.
Image - Mirror.
Position above the Apples.
Layer Palette - Change the Blend Mode to Soft Light.
Layers - Duplicate. Image - Flip.
5)Maximize woman_196_tubed_by_thafs, Edit - Copy. Close tube. Edit - Paste - as a New Layer.
Image - Mirror
Position to the left and move her down so that all of her hair shows.
Effects- 3D Effects - Drop Shadow. Settings 2,4,70,15.00 color Black #000000.
Layers - Merge - Merge All Flatten.
6)Image - Add Borders. Add a 2 pixel symmetric border in your background color.
Layers - Promote Background Layer.
Edit - Copy.
Image - Resize. 94%. All Layers Unchecked, same settings as above.
Layers - New Raster Layer. Layers - Arrange - Send to Bottom.
Selections - Select All. Edit - Paste Into Selection.
Adjust Blur, Gaussian Blur Radius 27%. Select none.
Plugins - AP 01 Innovations - Lines, Silver Lining. Settings Open the drop down bar and Select Diamond Bill.
7)Layers Palette - Select Top Layer.
Effects - 3D Effects - Drop Shadow. Same Settings. Repeat but this time change the Horizontal and Vertical to negative values -2, -4.
Layers - Merge - Merge All Flatten.
Image - Add Borders - Add a 2 symmetric Border in #000000 Black.
Add your watermark. Your Done.
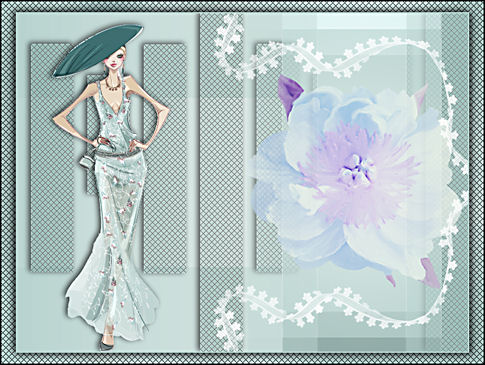
Another Example
Home
©PSPPEG 2011
All Rights Reserved