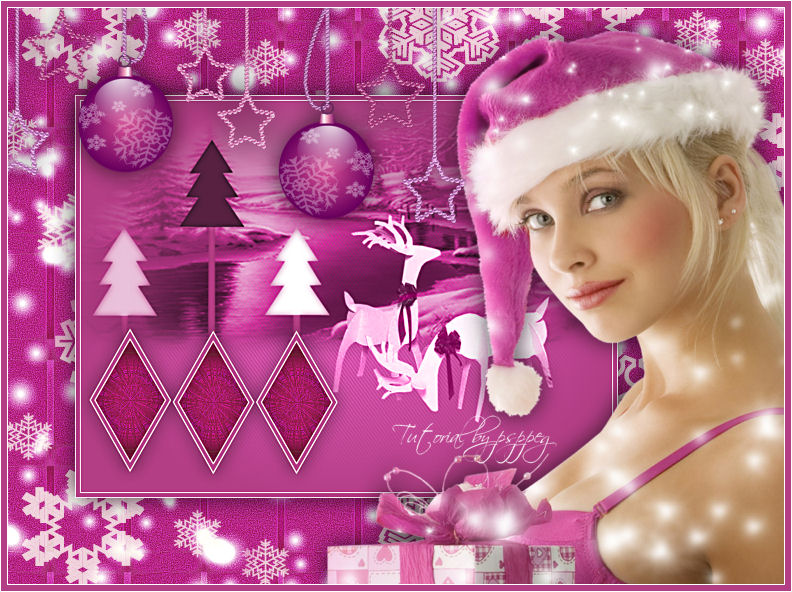
A Merry Krusty Christmas
Merry Christmas!
Filters Required:
Krusty's FX 2.0 Vol. II
VDL Adrenaline - Snowflakes
Simple
If you need a filter..select the linked image below and scroll down the page.

------------------------
Tubes Required:
Jen Vrouw Main tube
3 tubes by Guismo
Main Tube was created by JHanna. Thank you Johanna for the permission of using your tube in the tutorial. To receive her tubes 
3 Accent tubes are by Guismo
To view more Fantastic Tubes by the Tuber Sév_Guismo click image below.

Many Thanks Sev
------------------------
Materials
------------------------
|
Preparation:
Look thru the list of filters and make certain you have them.
Open all tubes in your psp program and minimize.
Material Palette - Set foreground to #b33e85 and background to #ffffff.
Lets Begin:
A)Distant Background
1)File, New Image, 760wx560h, transparent.
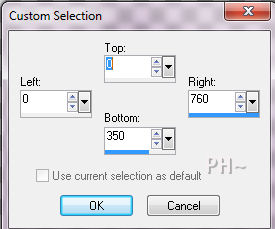
2)Selections Tool - Custom Selection

3)Maximize All_Is_Calm.psp - Edit - Copy - Close tube - Edit - Paste - Paste Into Selection
4)Selections - Select None
5)Image - Resize - Resize 125%, all layers unchecked
6)Layers - New Raster Layer
7)Flood Fill Foreground Color, Duplicate
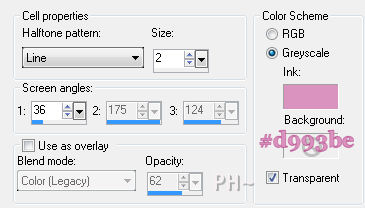
8)Effects - Artistic Effects - Half Tone

9)Layers - Merge - Merge Down
10)Layer Palette - Blend Mode: Color
11)Layers - Merge - Merge Visable
12)Layers - New Raster Layer
13)Layers - Arrange - Send to Bottom
14)Flood Fill Foreground Color
15)Layer Palette - Select Top Layer
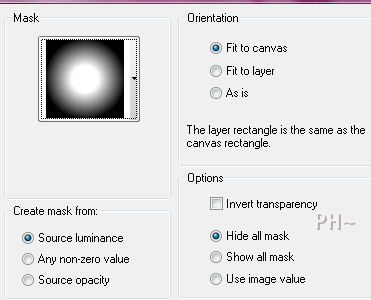
16)Layers - Load Mask - Load Mask 20/20

17)Layers - Merge - Merge Group
B)Adding Reindeer
1)Maximize calguisitschristmas2112011.psp - Edit - Copy - Close tube - Edit - Paste - Paste as a New Layer
2)Image - Resize - Resize 75%, all layers unchecked
3)Effects - Image Effects - Offset - Horizontal 130, Vertical 0, Transparent
4)Layer Palette - Blend Mode: Luminance Legacy
C)Adding Christmas Trees
1)Maximize calguisdeconoelsapin4112011.psp - Edit - Copy - Close tube - Edit - Paste - Paste as a New Layer
2)Image - Resize - Resize 60%, all layers unchecked
3)Effects - Image Effects - Offset - Horizontal: minus 190, Vertical: 70, transparent
4)Adjust - Hue and Saturation- Colorize

D)Adding Elements
1)Maximize psppeg_element1.psp - Edit - Copy - Close tube - Edit - Paste - Paste as a New Layer
2)Effects - Image Effects - Offset - Horizontal: minus 190, Vertical: minus 150, transparent
3)Magic Wand Tool - Mode: Add, Match Mode: RGB, Tolerance and Feather 0
4)Select Centers of each Diamond
5)Selections - Modify - Expand by 2 pixels
6)Layer Palette - Select Layer just below this Layer
7)Layers - New Raster Layer - Flood Fill with Foreground Color
8)Layers - Duplicate
9)Selections - Select None
10)Magic Wand Tool - Select First Diamond Center
11)Selections - Modify - Expand by 2 pixels
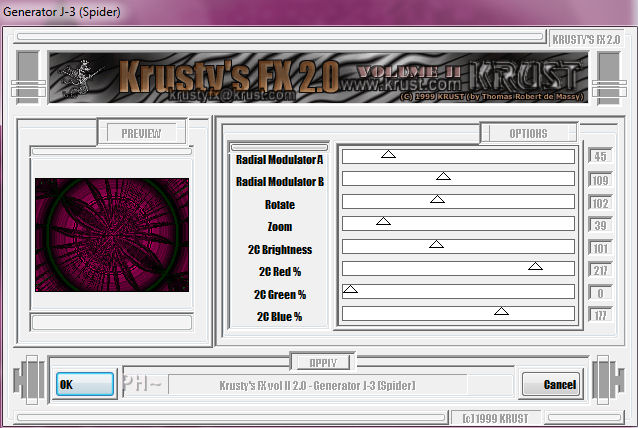
12)Effects - Plugins Krusty's FX vol. II 2.0 - Generator J-3 (Spider)

13)Repeat Steps 9 - 12 for the two remaining diamond centers
14)Effects - Edge Effects - Enhance
15)Layer Palette - Blend Mode: Overlay, Opacity: 55
16)Layer Palette - Select Top Layer
17)Effects - 3D Effects - Drop Shadow 0,0,73,34, black
E)Creating Center Image
1)Layers - Merge - Merge All
2)Image - Add Borders - Add a 1 pixel Symmetric Border in Color #ffffff
3)Image - Add Borders - Add a 1 pixel Symmetric Border in Color #b33e85
4)Image - Add Borders - Add a 1 pixel Symmetric Border in Color #ffffff
5)Layers - Promote Background Layer
6)Image - Resize - Resize 70%, all layers unchecked
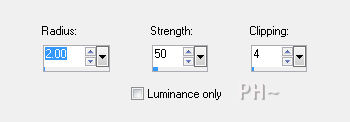
7)Adjust - Sharpen - Unsharp Mask

8)Effects - Image Effects - Offset - Horizontal: minus 50, Vertical: 0, Transparent
F)Creating Background
1)Layers - New Raster Layer
2)Layers - Arrange - Send to Bottom
3)Flood Fill Foreground Color
4)Layers - New Raster Layer
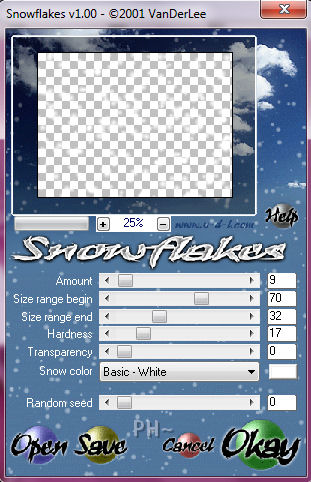
5)Effects - Plugins - VDL Adrenaline - Snowflakes

6)Layers - New Raster Layer
7)Flood Fill Foreground Color
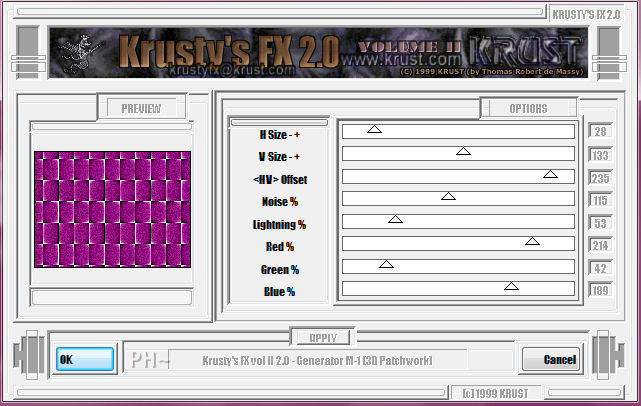
8)Effects - Plugins - Krusty FX vol. II 2.0 - Generator M-1 (3D Patchwork)

9)Effects - Edge Effects - Enhance More
10)Effects - Plugins - Simple - 4way Average
11)Layer Palette - Blend Mode: Overlay, Opacity: 60
12)Layers - New Raster Layer
13)Change Foreground Color to Pattern - Find psppeg_snowflakes.psp - Angle 0, Scale 65.
14)Flood fill Layer with Pattern
15)Layer Palette - Lower Opacity to 80
16)Layer Palette - Select Top Layer
17)Effects - 3D Effects - Drop Shadow - same settings
18)Layers - Merge - Merge Visable
G)Main Tube
1)Maximize Jen_Vrouw_530_06_11_2011.psp - Edit - Copy - Close Image - Edit - Paste - Paste As a New Layer
2)Image - Resize - Resize 70%, all layers unchecked
3)Mover Tool - Position Far right Bottom Corner
4)Effects - 3D Effects - Drop Shadow, same settings
G)Accent Tube
1)Maximize calguisdecornoel2112011.psp - Edit - Copy - Close Image - Edit - Paste - Paste As a New Layer
2)Image - Resize - Resize 60%, all layers unchecked
3)Mover Tool - Position Top Center
4)Freehand Selection Tool - Point to Point - Add, Feather 0
5)Select by going around the blue and red star
6)Adjust - Hue and Saturation - Colorize, same settings
7)Layers - Duplicate - Image Mirror
8)Mover Tool - Position higher than the orignal tube and to the left corner
9)Layers - Merge - Merge Down
10)Effects - 3D Effects - Drop Shadow - same settings
H) Framing
1)Layers - Merge - Merge All
2)Image - Add Borders 1 pixel Symmtric Border in #ffffff
3)Image - Add Borders 6 pixels Symmtric Border in #b33e85
4)Image - Add Borders 1 pixel Symmtric Border in #ffffff
K)Finalizing
1)Add your watermark
2)Add text
3)Layers - Merge - Merge All Flatten.
Home
©PSPPEG 2011
All Rights Reserved
