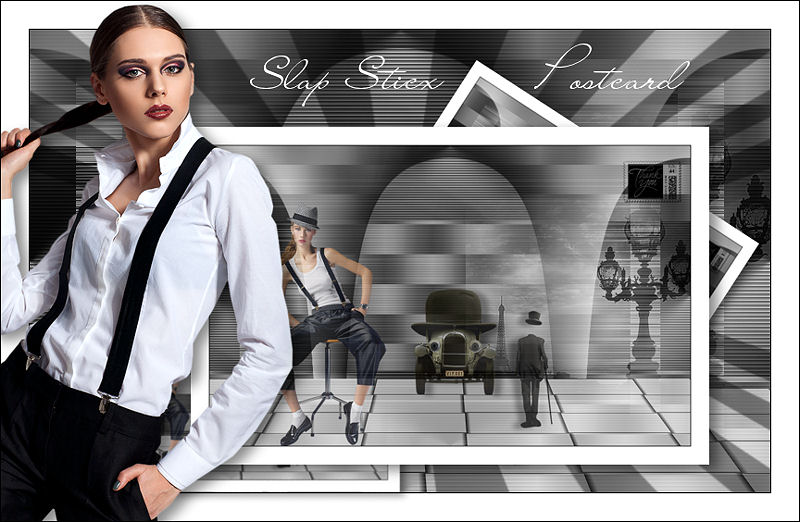
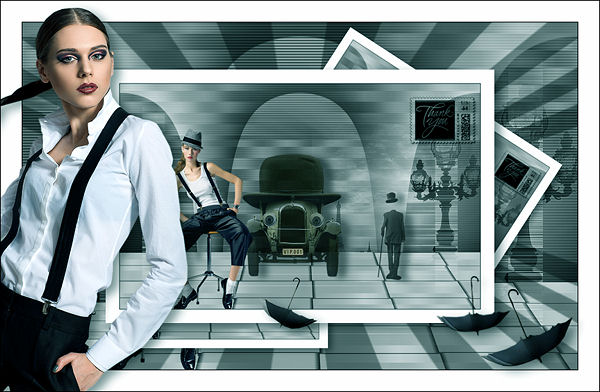
Slap Sticx Postcard
Filters Required:
Toadies
DSB Flux
Neology
If you need a Filter go to home page then select filters
------------------------
Tubes Required:
2 female tubes
2 accent tubes
1 scenery tube
1 mask (provided)
Tubes by Nikita, Mary, Tony, thafs and mou
PSPPEG has been given permission to use the tubes provided in this tutorial.
To view more Fantastic Tubes click image below.
Many Thanks!
------------------------
Materials
------------------------
|
Preparation:
Look thru the list of filters and make certain you have them.
Open all tubes and mask in your psp program and minimize.
Maximize brush_psppeg_stamp - Brush Tool - Create Brush Tip
-------------------------
Material Palette
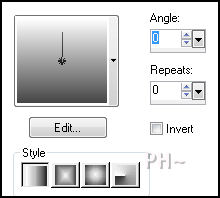
Material Palette - Set foreground to #000000 and background to #ffffff or select two colors to work with. Set Foreground to Gradient - Style Linear, Gradient Foreground/Background, Angle 0, Repeats 0, Invert unchecked.
Lets Begin:
A)Background
1)File, New Image, 800 w x 500 h, transparent.
2)Flood Fill with Gradient.
3)Selections - Select All
4)Layers - New Raster Layer
4)Maximize vue_sur_paris_tubed_by_thafs.psp (Keep Selection) - Edit - Copy - Minimize - Edit - Paste Into Selection
5)Layer Palette - Blend Mode: Luminance Legacy, Opacity: 50
6)Selections - Select None
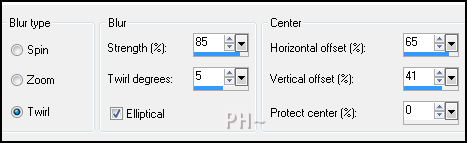
7)Adjust - Blur - Radial Blur
8)Effects - Image Effects - Seamless Tiling
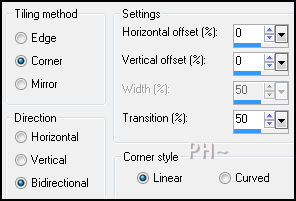
9)Effects - Texture Effects - Blinds

10)Layers - Duplicate
11)Layer Palette - Blend Mode: Multiply
12)Layers - Merge Visable
B)Background Elements One
1)Layers - New Raster Layer
2)Selection Tool - Rectangle - Custom Selection
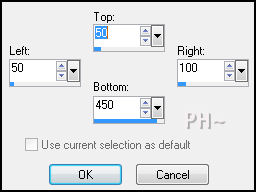
3)Flood Fill Background Colour
4)Selections - Select None
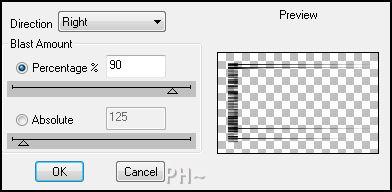
5)Effects - Plugins - DSB Flux - Blast
6)Layer Palette - Blend Mode: Screen, Opacity: 60
7)Layers - Duplicate
8)Image - Mirror
C)Background Elements 2
1)Layers - New Raster Layer
2)Selections - Select All
3)Selections - Modify - Contract - 125 pixels
4)Flood Fill Background Colour - Selections - Select None
5)Effects - Plugins - Toadies - 3D Checkers - Default
6)Effects - Distortion Effects - Wind 100% from Right then Left
7)Effects - Image Effects - Seamless Tiling - Same Settings
8)Layer Palette - Blend Mode: Luminance Legacy, Opacity: 65
D)Background Element 3
1)Layers - New Raster Layer
1)Selections Tool - Custom Selection
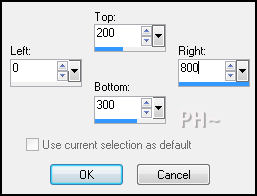
2)Material Palette - Set Foreground to Gradient
3)Flood Fill Selection with Gradient
4)Select None
5)Effects - Distortion Effects - Polar Co-ordinates - Select Polar to Rectangular
6)Effects - Image Effects - Offset - Horizontal: 0, Vertical 80, transparent
7)Layer Palette - Opacity: 55
E)Scenery
1)Maximize vue_sur_paris_tubed_by_thafs.psp - Edit - Copy - Close image - Edit - Paste As a New Layer.
2)Image - Resize - 65%, all layers unchecked
3)Effects - Image Effects - Offset - Horizontal: 220, Vertical: 0, transparent
4)Layer Palette - Blend Mode: Luminance Legacy, Opacity: 50
F)Foreground
1)Layers - New Raster Layer, View - Rulers
2)Flood Fill - Background Colour
3)Effects - Plugins - Neology - Digital Weaver - Weaver Size: 141, Shadow Size: 255
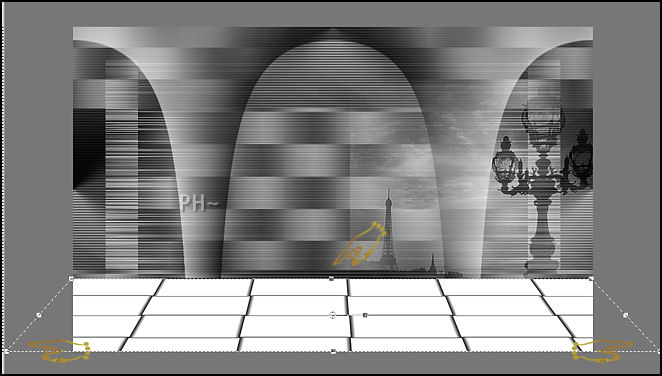
4)Raster Deform Tool (Hit K Key)
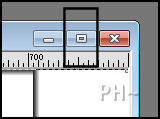
5) On you Working Image - Hit the Maximize Square (upper Right Corner)
6) Deformation Tool - Slide the Center Node Down to 389 on side ruler (Creating your Walkway)
Then, Holding your CTRL Key Slide the bottom Right or Left Node to the edge of your canvas space (Creating your Perspective)
7)Layer Palette - Blend Mode: Luminance Legacy, Opacity: 60
8)Selections Tool - Custom Selection
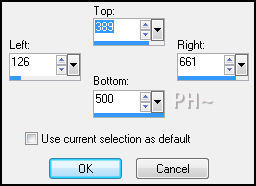
(Note: If your selection does not meet the upper edge of your walkway then do this: Mover Tool - Selections - Edit Selection - Move the Red Square up until it does meet the upper edge of your walkway then Selections - Edit Selection again - Your Selection will then be in the right place)
9)Layer Palette - Select Layer 3RD From the Top (The Polar Co-ordinate Layer)
10)Hit your Delete Key (This removes any of the column from showing below the floor)
11)Selections - Select None
12)Layer Palette - Select Top Layer
G)Placing your Scene
1)Maximize 13186825846_feerique_nikita.psp - Select Layer fantome-nikita - Edit - Copy - Minimize - Edit - Paste - As a New Layer
2)Image - Resize 65%, all layers unchecked, Repeat
3)Mover Tool - Position on the inside but near, the right column
4)Effects - 3D Effects - Drop Shadow - 3, 20, 45, 20.00, black
5)Maximize mou_strange car.psp - Edit - Copy - Close - Edit - Paste - As a New Layer
6)Image - Resize 65%, all layers unchecked, Repeat
7)Mover Tool - Position Center touching Foreground
8)Effects - 3D Effects - Drop Shadow -Same Settings
9)Maximize Tocha23915.psp - Edit - Copy - Close - Edit - Paste - As a New Layer
10)Image - Resize 65%, all layers unchecked, Repeat
11)Mover Tool - Position Infront of Left Column, Her Feet touching Bottom of Image
12)Effects - 3D Effects - Drop Shadow -Same Settings
13)Layer Palette - Opacity of All 3 Tubes: 75
14)Layers - Merge Visable
J)Framing
1)Layers - Merge - Merge All
2)Image - Add Borders - 1 pixels symmetric border - with #000000, black.
3)Image - Add Borders - 30 pixels symmetric border - White #ffffff.
4)Layers - Duplicate
5)Image - Resize - 65%, all layers unchecked
6)Brush Tool - Select the Brush Tip you created - Stamp the smaller image top right corner
7)Effects - 3D Effects - Drop Shadow - 6, 9, 45, 20.00, black
8)Layers - Duplicate, Twice
9)Image - Free Rotate - 33% to the Right
10)Layers - Arrange - Move Down, twice
11)Image - Resize - 65%, all layers unchecked
12)Mover Tool - Position where Desired
13)Layer Palette - Top Layer (Duplicate) - Repeat Steps 10, 11, 12
14)Layer Palette - Select Bottom Layer
15)Layers - New Raster Layer
16)Flood Fill with Foreground Colour
17)Layers - New Mask Layer - From Image - Mask: mask_psppeg_ssp - Source Luminance checked, Invert mask data checked
18)Layers - Merge Group
19)Layer Palette - Opacity: 40
20)Selections - Select All
21)Selections - Modify - Contract - 30 pixels
22)Selections - Invert - Hit - Delete Key
23)Selections - Select None
24)Layer Palette - Select Top Layer
23)Maximize Mary_090312-1.psp - Edit - Copy - Close - Edit - Paste - As a New Layer
24)Image - Resize - 65%, all layers unchecked
25)Mover Tool - Position to the Far Left
26)Effects - 3D Effects - Drop Shadow - Same Settings
27)Image - Add Borders - 1 pixels symmetric border - with #000000, black.
K)Finalizing
1)Add your watermark
2)Add text
3)Layers - Merge - Merge All Flatten.
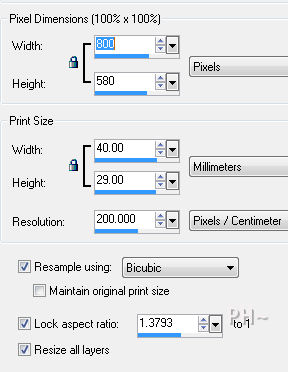
4)Image - Resize 800 pixels.
Your done.
Another Example
Home
©PSPPEG 2011
All Rights Reserved