Lucy in the Sky
Filters Required:
Simple
Mura Meister's - Seamless
If you require a filter try Here
------------------------
Tubes Required:
Main Tube Female by Nikita
elements by PsP Peg
2 Masks both by Narah
The main tube was provided by Nikita with permission.
You can find her Tubes Here!
Many Thanks!
------------------------
Materials
------------------------
|
Preparation:
Look thru the list of filters and make certain you have them.
Open all tubes and masks in your psp program and minimize.
Place Selection Files in PSP Selections Folder
-------------------------
Material Palette
Material Palette - Foreground: #fda146, Background: #a96427
I encourage you to use your own tube and colour palette or follow the tutorial.
The colours are two hues of the same colour, one lighter and the other darker.
Lets Begin:
A)Background
1)File, New Image, 800 w x 550 h, transparent.
2)Flood Fill with your background colour
3)Layers - New Raster Layer
4)Flood Fill with Foreground Colour
5)Layers - New Mask Layer - From Image - Mask: Narah_mask_Abstract182 - Source Luminance: Checked, Invert: Unchecked
6)Layers Merge Group
7)Layers - Merge Visable
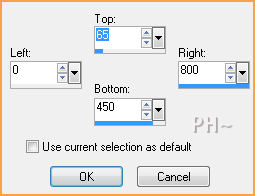
8)Selections Tool - Rectangle - Custom Selection
9)Selections - Promote Selection to Layer
10)Layer Palette - Turn off Visability of this layer, we will be using it later
Selections - Select None
11)Layer Palette - Select Bottom Layer
Effects - Plugins - Simple - 4 Way Average
B)Deco Layer
1)Selections - Load/Save Selections - Load: psppeg_lits1.sel
2)Layers - New Raster Layer
3)Flood Fill Foreground Colour
4)Selections - Select None
5)Effects - Distortion Effects - Wind - 100% from left
6)Effects - Image Effects - Offset - Horizontal: 0, Vertical: minus 250, transparent
7)Layers - Duplicate
8)Image - Resize - 80%, all layers unchecked
10)Layers - Merge - Merge Down
7)Effects - Plugins - Mura Meisters Seamless - Shift at Wave
8)Layer Palette - Blend Mode: Soft Light, Opacity: 38
9)Layers - Duplicate
10)Image - Flip
11)Layers - Merge Visable
C)Mask Layer
1)Layers - New Raster Layer
2)Flood Fill White
3)Layers - New Mask Layer - From Image - Mask: Narah_mask_Abstract162 - Sorce Luminance Checked, Invert Mask Unchecked
4)Layers - Merge - Merge Group
5)Layer Palette - Blend Mode: Dodge, Opacity: 48
D)Lines
1)Material Palette - Background: Null, Pen Tool

2)Holding the shift key draw 3 different Vertical length lines, Converting raster after each one
3)Layers - Merge Down, repeat, all lines on one layer
5)Layers - Duplicate
6)Image - Mirror
7)Layers - Merge Down
8)Layer Palette - Opacity: 70
E)Main Tube and Balls
1)Layer Palette - Select Top Layer - Turn on Visability
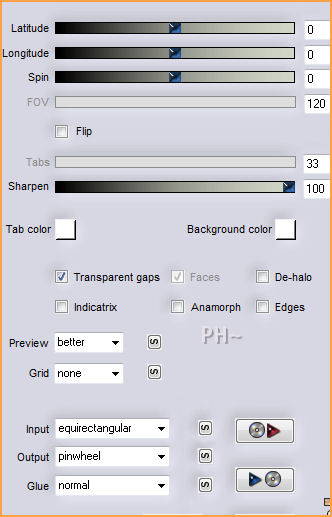
2)Effects - Plugins - Flaming Pear - Flexify 2.0
3)Image - Resize - 50%, all layers unchecked
4)Maximize 1228305185.psp - Edit - Copy - Close - Edit - Paste - As a New Layer
5)Image - Resize - 50%, all layers unchecked
6)Mover Tool - Position over the ball, place it to the top of the ball
7)Layers - Merge Down
8)Layers - Duplicate
9)Image - Resize - 70%, all layers unchecked
10)Repeat Steps 8) and 9)
11)Mover Tool - Position: Where Desired
F)Accents
1)Selections - Load/Save Selections - Load: psppeg_lits2.sel
2)Flood Fill Tool - Match Mode: None, Tolerance 0, Blend Mode: Normal, Opacity: 100
3)Layers - New Raster Layer
4)Flood Fill White
5)Selections - Select None
6)Layers - Duplicate
7)Image - Mirror - Flip
8)Maximize - diamonds_psppeg_sky.psp - Edit - Copy - Close - Edit - Paste - As a New Layer
9)Effects - Image Effects - Offset - Horizontal: minus 100, Vertical: 0, transparent
10)Maximize - text_psppeg_sky.psp - Edit - Copy - Close - Edit - Paste - As a New Layer
11)Effects - Image Effects - Offset - Horizontal: 100, Vertical:minus 50, transparent
12)Layers - Merge All
G)Framing
1)Image - Add Borders - Add a 2 pixel symmetric border in white
2)Image - Add Borders - Add a 30 pixel symmetric border in Your Foreground (light) Colour
K)Finalizing
1)Add Text
2)Add your watermark
3)Layers - Merge - Merge All Flatten.
Your done.
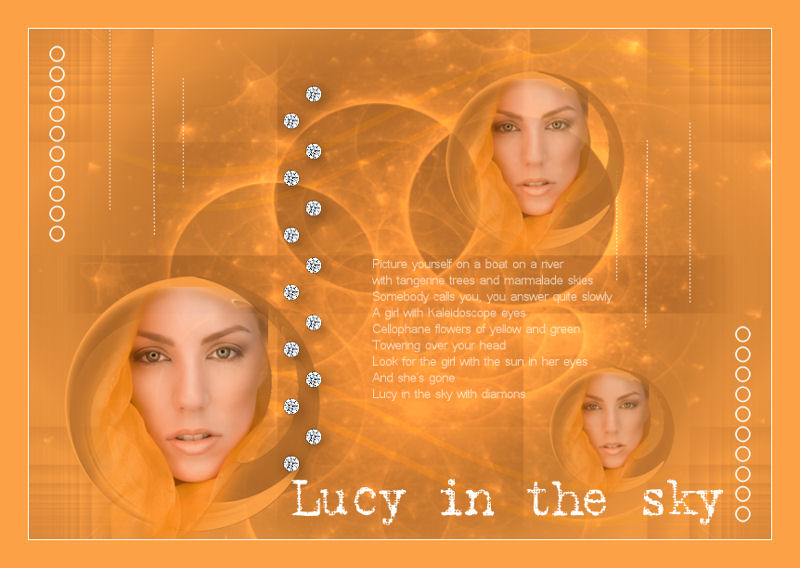
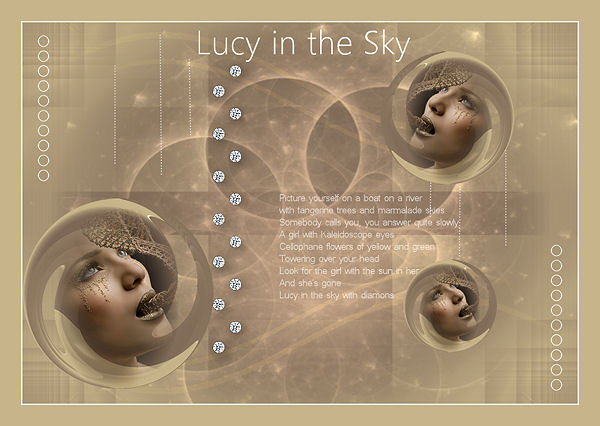
Another Example
Home
©PSPPEG 2011 - 2012
All Rights Reserved
Tutorial Created July 8th, 2012