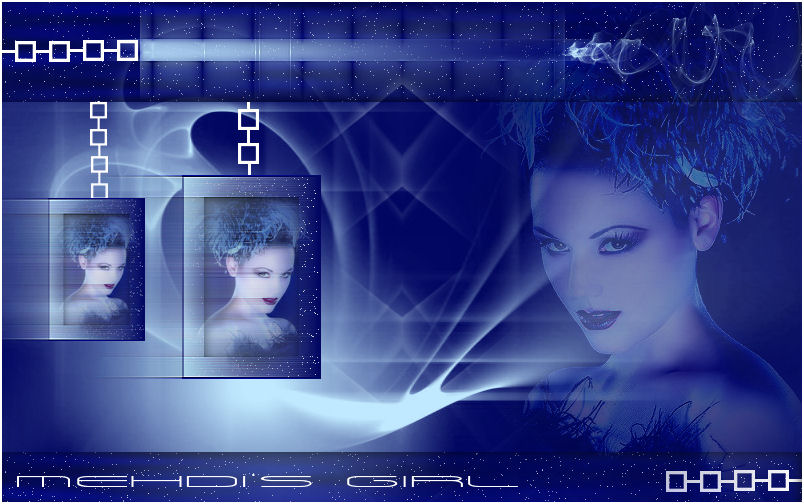
Mehdi's Girl
This tutorial requires several filters from Mehdi, thus the name.
Filters Required:
Mehdi's Collection of Filters
Xero - Sparkles
If you require a filter, try these Links
------------------------
Tubes Required:
Main Tube Female
2 elements
1 Mask by Narah
The main tube was provided by Nikita with permission.
You can find Nikita's Tubes Here!
Many Thanks Gina!
------------------------
Materials
------------------------
|
Preparation:
Look thru the list of filters and make certain you have them.
Place the 2 Selection Files in your Selection Folder
Open all tubes and masks in your psp program and minimize.
-------------------------
Material Palette
Material Palette - Foreground: #010660(a very dark colour from your tube), Background: #c0e9ff (a very light colour but bright)
I encourage you to use your own colour palette or follow the tutorial
Lets Begin:
A)Background
1)File, New Image, 800 w x 500 h, transparent.
2)Flood Fill with Foreground Colour
3)Layers - New Raster Layer
4)Flood Fill with Background Colour
5)Layers - New Mask Layer - From Image - Mask: Narah_mask_Abstract174, source luminance checked, invert mask unchecked
6)Layers - Merge Group
7)Layers - Duplicate
8)Effects - Plugins - Mehdi - Weaver
9)Layer Palette - Opacity: 77
10)Layers - Arrange -Move Down
11)Layers - Merge Down
12)Effects - Plugins - Mehdi - Kaleidoscope
13)Effects - Plugins - Mehdi - Eraser Genuine
B)Background Tube
1)Maximize 1228305190_femmes.psp - Edit - Copy - Minimize -Edit - Paste - As a New Layer
2)Effects - Image Effects - Offset - Horizontal: 250, Vertical: 0, transparent
3)Layer Palette - Blend Mode: Hard Light, Opacity: 38
C)Top
1)Material Palette - Change Foreground to Gradient - Gradient: Fading Foreground
Style: Linear, Angle: 270, Repeats: 0, Invert checked
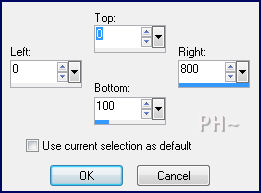
2)Selections Tool - Rectangle - Custom Selection
3)Layer Palette - Select Top Layer
4)Layers - New Raster Layer
5)Flood Fill with Gradient
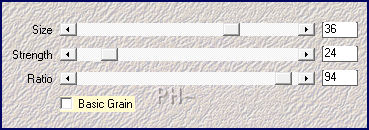
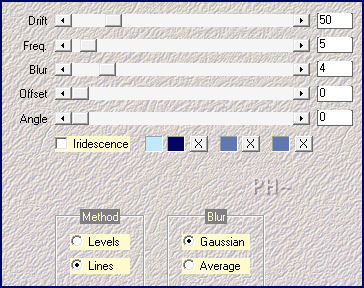
6)Effects - Plugins - Mehdi - Grain Natural 2.0
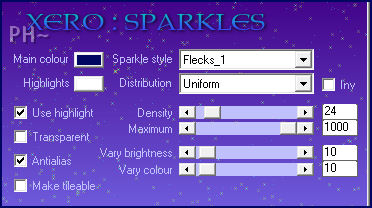
7)Effects - Plugins - Xero - Sparkles
8)Layers - New Raster Layer
9)Effects - 3D Effects - Cutout
10)Repeat Cutout with minus values H & V
11)Layers - Merge Down
12)Selections - Select None
13)Layers - Duplicate
14)Image - Flip
15)Effects - Image Effects - Offset - Vertical: minus 50, Horizontal: 0, transparent
D)Top Effects
1)Maximize - element1_psppeg_mehdi.psp - Edit - Copy - Edit - Paste - As a New Layer
2)Image - Free Rotate - Left - 90 degrees, all layers unchecked
3)Mover Tool - Position: As shown below
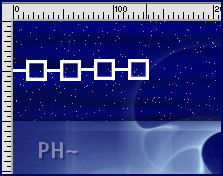
5)Selections - Load/Save Selections - Load: psppeg_mg1.sel
6)Layer Palette - Select Layer Third from Top
7)Selections - Promote Selection to Layer
8)Selections - Select None
9)Effects - Plugins - Mehdi - Vibrations 1.1
10)Effects - Plugins - Mehdi - Weaver
11)Maximize - element2_psppeg_mehdi.psp - Edit - Copy - Edit - Paste - As a New Layer
12)Mover Tool: Position top Right corner - coming out of selection
13)Layer Palette - Select Top Layer
14)Layers - Duplicate
15)Image - Mirror - Flip
16)Mover Tool - Move Down - Centering it on Bottom
E)Frames
1)Maximize - 1228305190_femmes.psp - Edit - Copy - Close - Edit Paste - AS a NEW IMAGE
2)Image - Resize - Height 200 pixels, all layers checked
3)Layers - New Raster Layer
4)Layers - Arrange - Send to Bottom
5)Material Palette - Foreground - Change Gradient to Foreground/Background - Same Settings
6)Flood Fill with Gradient
7)Selections - Select All
8)Selections - Modify - Contract - 20 pixels
9)Layer Palette - Select Top Layer
10)Layers - Merge Down
11)Layers - New Raster Layer
12)Effects - 3D Effects - Cutout - Same Settings
13)Repeat Cutout changing H & V setting to Positive
14)Selections - Invert
15)Layers - Merge Visable
16)Effects - Plugins - Xero - Sparkles - Same Settings
17)Selections - Select None
18)Edit - Copy - Edit - Paste - As a New Layer
19)Effects - Image Effects - Offset - Horizontal: minus 139, Vertical: minus 25, transparent
20)Layers - Duplicate
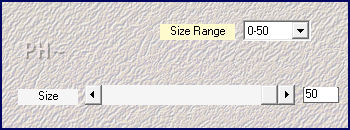
21)Image - Resize 70%, all layers unchecked
22)Effects - Image Effects - Offset - Horizontal: minus 200, Vertical: 0, transparent
23)Layers - Duplicate
24)Effects - Distortion Effects - Wind - From Right - Strength: 100%
25)Layer Palette - Opacity: 67
26)Layers - Merge Down
27)Layer Palette - Select Layer Below (The Larger Frame)
28)Repeat Step 22) to 25)
29)Layer Palette - Select Layer Below
30)Layers - New Raster Layer
31)Selections - Load/Save Selection - Load psppeg_mg2.sel
32)Flood Fill - White (Note: Match Mode: None)
33)Selections - Select None
G)Framing
1)Image - Add Borders - Add a 2 pixel symmetric border in white
2)Image - Add Borders - Add a 1 pixel symmetric border in your dark colour
K)Finalizing
1)Add Text
2)Add your watermark
3)Layers - Merge - Merge All Flatten.
Your done.
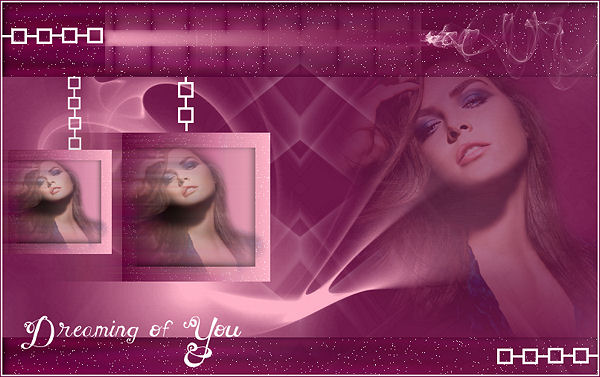
Another Example
Home
©PSPPEG 2011 - 2012
All Rights Reserved
Tutorial Created July 18th, 2012