
Looking For Love
This tut can be created with any pattern, texture, colour or tube.
Filters Required:
Simple
------------------------
Tubes Required:
Main Tube by Claudia
Other Tube by Alie
PSPPEG has been provided permission to use the tubes provided in this tutorial.
To view more Fantastic Tubes by the Tubers click image below.

Many Thanks!
------------------------
Materials
------------------------
|
Preparation:
Open all tubes in your psp program and minimize.
Place Selection in your PSP Selection Folder
Place Texture in Texture File
------------------------------
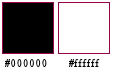
Colours
Material Palette - Set foreground to #000000 and background to #ffffff
or select a light and dark colour to work with.
Lets Begin:
A)Background
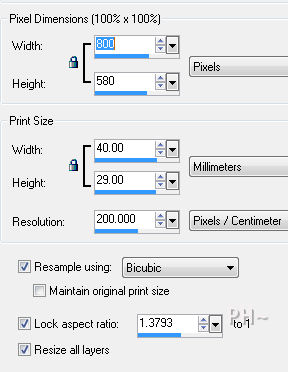
1)File, New Image, 800 w x 500 h, transparent
2)Flood Fill with background colour.
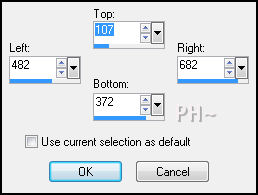
3)Selections Tool - Custom Selection
4)Layers - New Raster Layer
5)Flood Fill - Foreground Colour
6)Selections - Modify - Contract - 20 pixels - Hit Delete Key (Keep Selected)
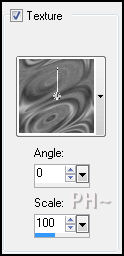
7)Material Palette - Left Click Foreground - Select Texture - Change Texture as shown
8)Flood Fill with Texture
9)Selections - Modify - Contract - 20 pixels - Hit Delete Key
10)Select None
B)Background Elements 1
1)Layers - Duplicate
2)Effects - Distortion Effects - Wind From Left, Strength: 100
3)Effects - Distortion Effects - Wind From Right, Strength: 100
4)Layers - Merge - Merge Down
7)Layers - Duplicate
8)Image - Mirror
9)Layers - Merge - Merge Down
C)Background Elements 2
1)Layers - New Raster Layer
2)Flood Fill - Foreground Colour
3)Layers - New Mask Layer - From Image - Mask: mask_looking_psppeg - Source Luminance checked, invert mask data checked
4)Layers - Merge - Merge Group
5)Layer Palette - Opacity: 40
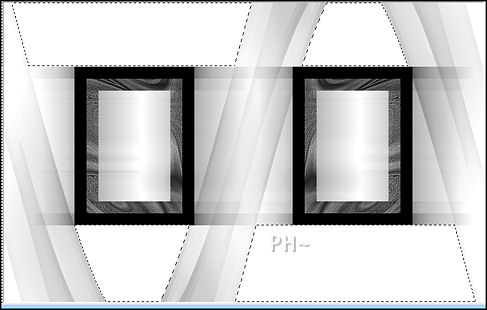
6)Selections - Load/Save Selections - Load: psppeg_lfl2.sel
7)Layer Palette - Select Layer below
8)Layers - New Raster Layer
9)Change Foreground back to Texture
10)Flood Fill Selection with texture
11)Layer Palette - Opacity: 25
12)Selections - Select None
D)Background Element 3
1)Layer Palette - Select Top Layer
2)Layers - Duplicate
3)Image - Mirror
E)Accent Tube
1)Maximize Alies 869-white flowers-03052012.psp - Edit - Copy - Close image - Edit - Paste As a New Layer.
2)Image - Resize 50%, all Layers unchecked
3)Mover Tool - Position Flower over right Frame Centering it
4)Layers - Duplicate
5)Image - Mirror
6)Layers - Merge - Merge Down
7)Effects - 3D Effects - Drop Shadow - 20,20,50,30, black
F)Accent Effect
1)Layer Palette - Select Bottom Layer
2)Layers - New Raster Layer
3)Selections - Load/Save Selections - Load: psppeg_looking1.sel
4)Flood Fill with Foreground Colour
5)Selections - Select None
6)Effects - Texture Effects - Blinds
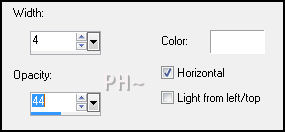
7)Effects - Distortion Effects - Wind - From Left 100%, From Right 100%
8)Layer Palette - Opacity: 34
G)Accent Tubes
1)Maximize element2_psppeg.psp - Edit - Copy - Close image - Edit - Paste As a New Layer.
2)Effects - 3D Effects - Drop Shadow - Same Setting
3)Maximize brush provided - place in your brush tips
4)Paint Brush Tool - Select the tip you just created
5)Layers - New Raster Layer
6)Stamp the brush once at the top of your image
J)Framing
1)Layers - Merge - Merge All
2)Image - Add Borders - 1 pixels symmetric border - with #000000
3)Image - Add Borders - 30 pixels symmetric border - White #ffffff.
4)Magic Wand Tool - Tolerance and Feather 0 - Select the White Border
5)Change Foreground to texture
6)Layers - New Raster Layer
7)Flood Fill with Texture
8)Effects - Plugins - Simple - Top Left Mirror
9)Layer Palette - Opacity: 60
10)Layers - Merge - Merge All
11)Effects - Cutout

12)Selections - Select None
13)Maximize your Main Tube tubeclaudiaviza-mujer2584.psp
14)Image - Resize - 70%, all layers unchecked
15)Effects - 3D Effects - Drop Shadow - Same Settings
16)Mover Tool - Position to the left, touching bottom border
17)Image - Add Borders - 30 pixels symmetric border - black #000000
K)Finalizing
1)Add your watermark
2)Add text (text provided)
3)Layers - Merge - Merge All Flatten.
4)Image - Resize 800 pixels.
Your done.
Another Example

Home
©PSPPEG 2011 - 2012
All Rights Reserved
Created May 27th 2012