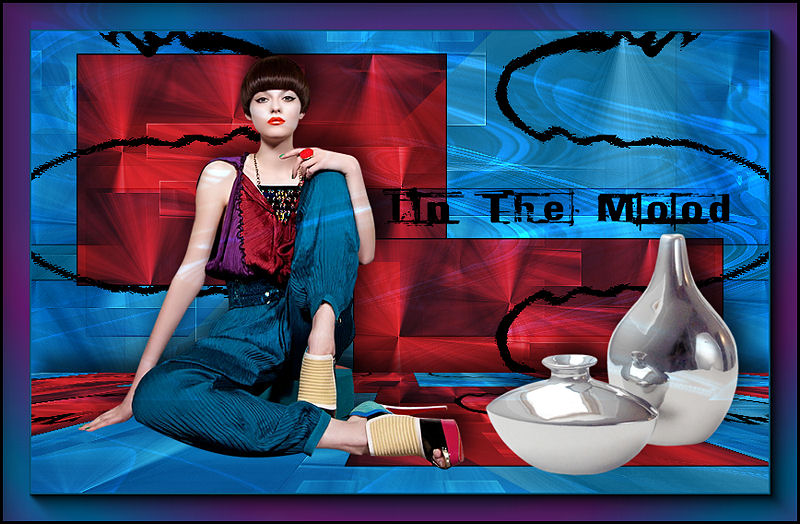
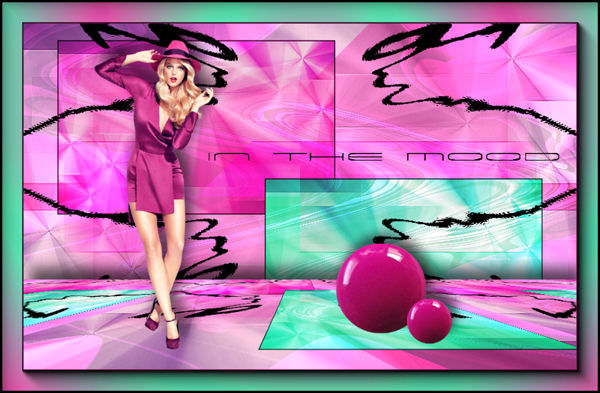
In the Mood
Filters Required:
Mura Meister's - Copies
Mura Meister's - Perspective
Simple
AAA Frames
If you need a filter..select the linked image below and scroll down the page.

------------------------
Tubes Required:
Main Tube by Tony Chavarria
Accent Tube by SvB
I have permission to use the tubes provided in this tutorial.
To view more Fantastic Tubes by the Tubers click image below.
Many Thanks!
------------------------
Materials
------------------------
|
Preparation:
Look thru the list of filters and make certain you have them.
Open all tubes in your psp program and minimize.
Place Texture in Textures Folder
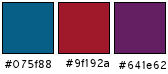
Material Palette - The Foreground is #075f88 the Background is #000000
--------------------------
Lets Begin:
A)Background
1)File, New Image, 800 w x 500 h, transparent.
2)Flood Fill with Foreground Color.
3)Layers - New Raster Layer
4)Selections - Select All
5)Maximize your Main Tube - Edit - Copy - Minimize - Paste Into Selection
6)Selections - Select None
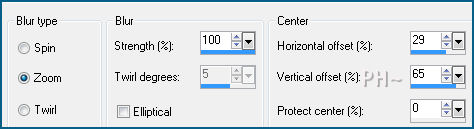
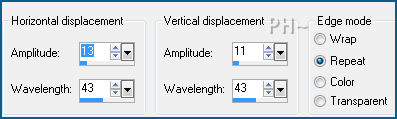
7)Adjust - Blur - Radial Blur
8)Layer Palette - Blend Mode: Luminance Legacy
9)Effects - Image Effects - Offset - Horizontal: minus 150, Vertical: 150, transparent
10)Effects - Plugins - Mura Meisters Copies - Default (Note: No two will be alike)
11)Effects - Edge Effects - Enhance
12)Layers - Duplicate
13)Image - Mirror - Image - Flip
14)Keyboard - Hold the Shift key and hit the D key
15)On the Duplicate Image - Image - Add Borders - 2 pixel symmetric border in black
B)Background Elements
1)Edit - Copy Duplicated Image - Close - Edit - Paste as a New Layer on Original Image
2)Image - Resize - 50 percent, all layers unchecked
3)Effects - Image Effects - Offset - Horizontal minus 150, Vertical 100, transparent
4)Layers - Duplicate
5)Image - Mirror - Image - Flip
(Note: Step 6 to 13 are Optional depending on the amount of colour you prefer)
6)Layer Palette - Select Second Layer from the Top
7)Selections - Select All, Select - Float, Select - Defloat
8)Layers - New Raster Layer
9)Material Palette - Change color to #9f192a - Flood Fill Selection
10)Selections - Select None
11)Layer Palette - Blend Mode: Color
12)Layers - Merge - Merge Down
13)Layer Palette - Select Top Layer - Repeat Steps 7) to 12) except use color #641e62
14)Layers - Merge - Merge Down (Both squares on same layer)
15)Layers - Duplicate
C)Background Elements 2
1)Effects - Image Effects - Seamless Tiling

2)Effects - Plugins - Simple - Pizza Slice Mirror
3)Layer Palette - Opacity 65 - Blend Mode: Overlay
4)Maximize element1_psppeg_itm.psp - Edit - Copy - Close - Edit - Paste as a New Layer
5)Layer Palette - Blend Mode: Dodge, Opacity: 65
(Note: If using different colors you could try using Blend Modes in the Layer Palette to change the color)
5)Layers - Merge - Merge Visable
D)Background Elements 3
1)Material Palette - Change Foreground to Black - Null Background
1)Pen Tool


2)View - Rulers
3)Place a node at 300 on the ruler along top and left side, Layers - Convert to Raster

4)Effects - Distortion Effects - Wave
5)Effects - Image Effects - Offset - Horizontal 0, Vertical 75, transparent
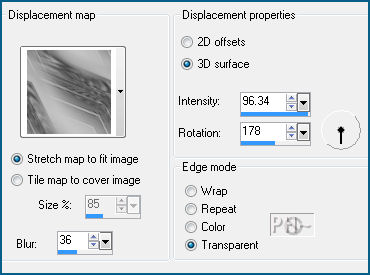
6)Effects - Distortion Effects - Displacement Map
7)Layers - Duplicate
8)Image Mirror
9)Layers - Merge - Merge Down
10)Layers - Duplicate
11)Image - Flip
12)Effects - Image Effects - Offset - Horizontal: 0, Vertical: 100, transparent
13)Layers - Merge - Merge Visable
14)Layers Duplicate
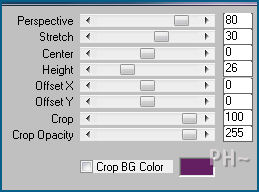
15)Effects - Plugins - Mura Meisters - Perspective
Effects - 3D Effects - Drop Shadow - Vertical: minus 17, Horizontal: 9, Opacity: 64, Blur: 30
E)Main Tube
1)Maximize Tocha23878.psp - Edit - Copy - Close image - Edit - Paste As a New Layer.
2)Image - Resize - 70%, all layers unchecked.
3)Effects - 3D Effects - Drop Shadow - Same Settings
4)Effects - Image Effects - Offset - Horizontal: minus 140, Vertical: 0, transparent
F)Accent Tube
1)Maximize SvB Metallic vaasjes.psp - Edit - Copy - Close - Edit Paste - As a New Layer
2)Image - Resize - Same Settings
3)Effects - Image Effects - Offset - Horizontal: 230, Vertical: minus 100, transparent
4)Effects - 3D Effects - Drop Shadow - Same Settings
5)Layers - Merge - Merge All
J)Framing
1)Image - Add Borders - 2 pixels symmetric border - with #075f88.
23)Image - Add Borders - 30 pixels symmetric border - black #000000.
3)Magic Wand Tool - Tolerance and Feather 0 - Select the Black Border
4)Material Palette: Foreground #075f88, background #641e62
5)Change Foreground to Gradient
6)Effects - Plugins -AAA Frames - Foto Frame

7)Selections - Select None
8)Image - Add Borders - 2 pixel symmetric border in black #000000
K)Additional Overlay
(Note: The purpose of the additional overlay is to add lights over all images)
1)Maximize element1_psppeg_itm.psp - Edit - Copy - Edit - Paste as a New Layer
2)Layer Palette - Blend Mode: Dodge, Opacity: 65
3)Effects - Image Effects - Offset - Horizontal: 0, Vertical: 100, transparent
L)Finalizing
1)Add your watermark
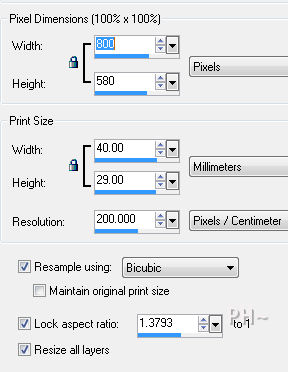
2)Image - Resize 800 pixels.
3)Add Text
4)Layers - Merge - Merge All Flatten
Your done.
Another Example
Home
©PSPPEG 2011 - 2012
All Rights Reserved