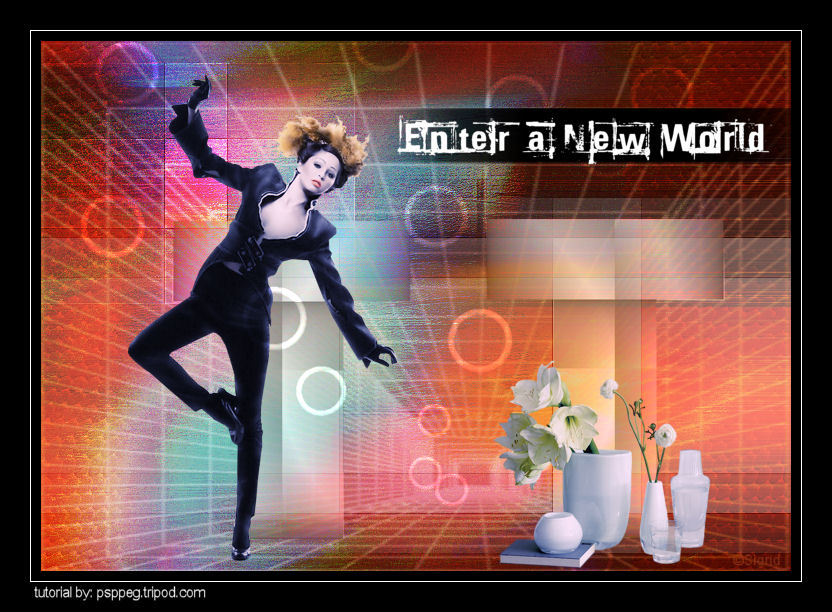
Enter a New World
This tutorial was created after viewing the movie 2012
Filters Required:
Eye Candy 5 - Textures
Toadies - What Are You
Nik Software - Color Efex Pro 3.0
If you need a filter..select the linked image below and scroll down the page.

------------------------
Tubes Required:
Main Tube female
accessories
elements
Selections and a Mask
------------------------
Materials
------------------------
|
Preparation:
Look thru the list of filters and make certain you have them.
Add the Selections to your Selection Folder.
Double Click the Eye Candy Presets. This places them into your program.
Open all tubes and mask in your psp program and minimize.
Material Palette - Set foreground to #ffffff.
Lets Begin:
A)Background
1)Maximize bkg_psppeg_nw.jpg - holding shift key hit the D key on your keyboard - close original
(If your using different colors now is the time to change the background color)
2)Layers - New Raster Layer
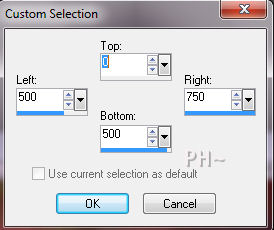
3)Selection Tool - Custom Selection - Left 500, Top 0, Right 750, Bottom 500.
4)Flood Fill with #ffffff
5)Selections - Select None
6)Effects - Plugins - Eye Candy 5 Textures - Reptile Skin - Select psppeg_rs_nw preset.
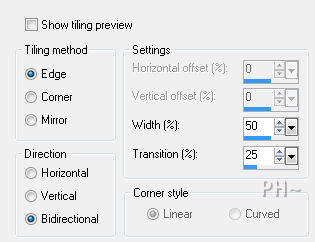
7)Effects - Image Effects - Seamless Tiling - Edge, Bidirectional, 50, 25.
8)Layer Palette - Blend Mode: Overlay, Opacity: 80.
B)Mask Layer
1)Layers - New Raster Layer
Flood Fill White.
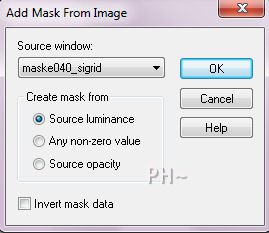
2)Layers - New Mask Layer - From Image - select maske040_sigrid, source luminance, Invert Mask Data Not Checked.
3)Layers - Merge - Merge Group.
4)Layer Palette - Blend Mode: Soft Light, Opacity: 100.
C)Background Element 1
1)Maximize bkg_element1_psppeg_nw.psp - Edit - Copy - Close Tube - Edit Paste - As a New Layer
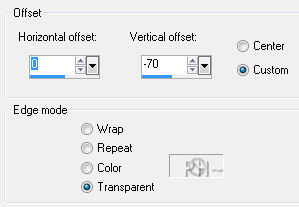
2)Effects - Image Effects - Offset - 0, minus 70, transparent.
D)Background Element 2
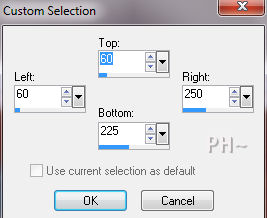
1)Selection Tool - Selection - Custom Selection - Left and Top 60, Right 250, Bottom 225.
2)Layers - New Raster Layer
3)Material Palette - Keep White in Foreground, Change Background to #4d7db0.
4)Flood Fill Selection with foreground color.
5)Selections - Select None.
6)Effects - Plugins - Toadies - What are you - 44, 37.

(Notice the square is white but the faded areas are blue)
7)Effects - Edge Effects - Enhance.
8)Layer Palette - Blend Mode: Overlay, Opacity 80.
E) Sky Scape
1)Maximize ketlandscape039.psp - Edit - Copy - Close Tube - Edit - Paste As New Layer
2)Image - Resize - 60% All Layers Unchecked
2)Mover Tool - Move Slightly Down and to the Right.
8)Layer Palette - Blend Mode: Soft Light, Opacity 100.
F)Columns
1)Maximize post_psppeg.psp - Edit - Copy - Close Tube - Edit - Paste As New Layer
2)Image - Resize 60%, All Layers Unchecked.
3)Mover Tool - Position to the right, over the white square, as shown below.
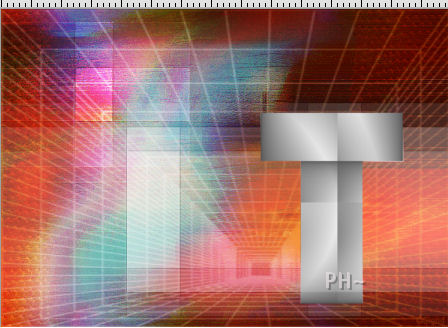
4)Layer Palette - Blend Mode: Luminance Legacy, Opacity 73.
5)Layers - Duplicate
6)Image - Mirror
7)Mover Tool - Position over the other white square to the left.
G)Main Tube
1)Maximize tubeclaudiaviza-mujer2055.psp - Edit - Copy - Close Tube - Edit - Paste As New Layer
2)Image - Resize - Same Settings
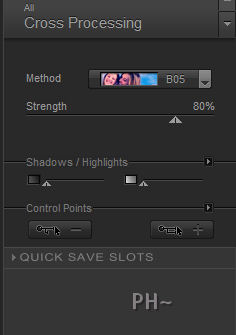
3)Effects - Plugins - Nik Software - Color Efex Pro 3.0 - Cross Processing - Method B05.
4)Image Mirror
5)Mover Tool - Position to the left
H)Adding More Elements
1)Maximize deco2_psppeg.psp - Edit - Copy - Edit - Paste - Paste As a New Layer.
2)Layer Palette - Blend Mode: Dodge, Opacity: 30
J)Adding Accessories
1)Maximize Dani@1499.psp - Edit - Copy - Edit - Paste - Paste As a New Layer.
2)Image - Resize - 40%, all layers Unchecked
3)Mover Tool - Position Bottom Right Corner, Infront of the Right Column.
4)Effects - Plugins - Nik Software - Color Efex Pro 3.0 - Same Settings.
J)Adding Text
1)Selections - Load/Save Selection - Load Selection from Disk - Load psppeg_nw1.sel.
2)Layers - New Raster Layer
3)Flood Fill with #000000
4)Selections - Select None
5)Effects - Distortion Effects - Wind - From Left, 100%.
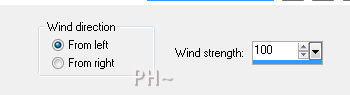
6)Repeat - Wind - Except Change From Left to From Right.
7)Material Palette - Null Foreground, #ffffff white in Background.
Add your Text with a Grungy type Font. We used Universally Corupt size 100.
K)Framing
1)Layers - Merge - Merge All
2)Image - Add Borders - 10 pixels symmetric border - Black #000000.
3)Image - Add Borders - 1 pixels symmetric border - White #ffffff.
4)Image - Add Borders - 30 pixels symmetric border - Black #000000.
K)Finalizing
1)Add your watermark
2)Layers - Merge - Merge All Flatten.
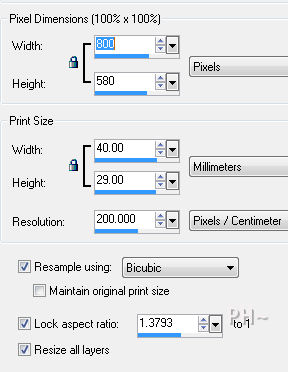
3)Image - Resize 800 pixels if desired.
Your done.
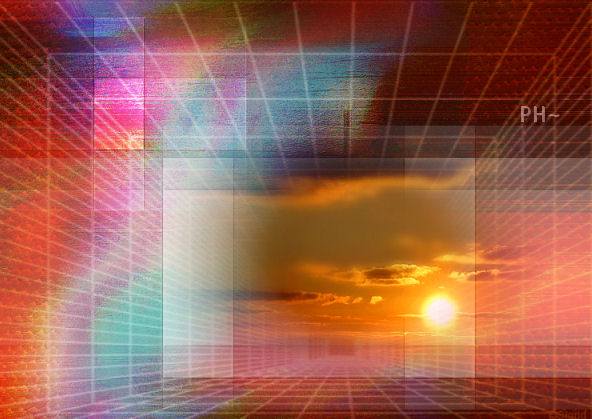
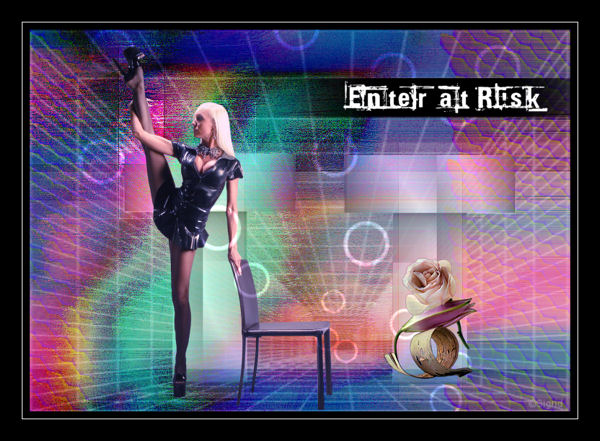
Another Example
Home
©PSPPEG 2011
All Rights Reserved