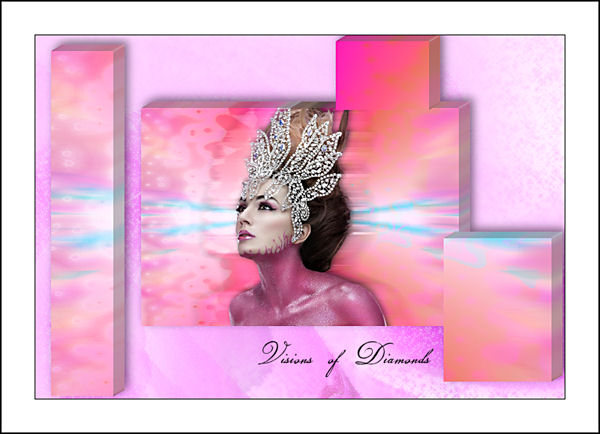
Visions
When substituting the female tube do not use a misted tube, use one that has definition and best a side view.
Filters Required:
Mezzo Force Ice
Andrews 06
Eye Candy 5 Impact
Filters Unlimited 2.0
If you require a filter from the above list, go to the home page, link is on the bottom of this page, go to filters at the top of the page, there is a list of filters there.
------------------------
Tubes Required:
Main Tube Female Face
------------------------
Materials
------------------------
|
Preparation:
Open the tube in your psp program and minimize.
Double hit the Eye Candy 5 plugin Settings, this will automatically place them in your plugins.
Place the Selection file in your psp file for selections.
Lets Begin:
1)File, New Image, 800wx550h, transparent.
Flood fill white
Effects - Plugins - Andrews Filters 06 - A Bit Left Over Gradient - Default Settings or adjust to match colors to your tube.
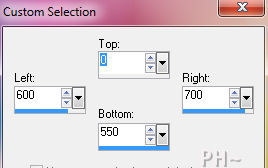
2)Tools - Selections - Custom Selection - Left 600, Top 0, Right 700, Bottom 550.
Selections - Promote Selection to Layer.
Selections - Select None.
Effects - Distortion Effects - Wind - From Right 100%
Effects - Plugins - Filter Effects Unlimited 2.0 - Distortion Filters - Ink Blots - Default Settings.
Change Blend mode to Hue Legacy and lower opacity to 50.
3)Layer Palette - Select Bottom Layer.
Image Mirror
Tools - Selections - Custom Selection - Same Settings.
Selections - Promote Selection to Layer
Selections - Select None.
Image Mirror.
Effects - Distortion Effects - Wind - From Right 100%.
Effects - Plugins - Filter Effects Unlimited 2.0 - Distortion Filters - Ink Blots - Default Settings.
Change Blend mode to Screen and lower opacity to 50.
Effects - Edge Effects - Enhance More.
4)Layer Palette - Select Bottom Layer.
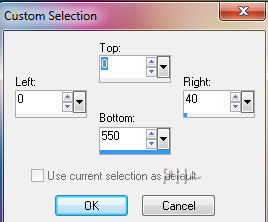
Tools - Selection - Custom Selection - Change the Left to 0 and the right to 40.
Selections - Promote Selection to Layer.
Selections - Select None.
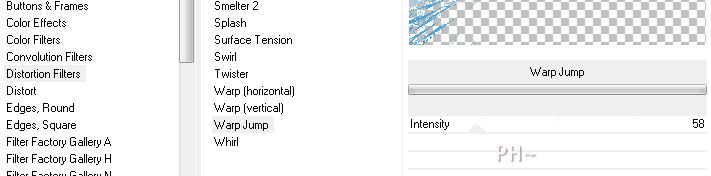
Effects - Plugins - Filters Unlimited 2.0 - Distortion Filters - Warp Jump - Default Settings.
Effects - Distortion Effects - Wind - Same Settings.
Effects - Plugins - Eye Candy 5 - Impact - Backlighting - Settings Tab - Filled, Faint - Default Settings
If using a different tube: Select the Colors tab and adjust the colors to match your tube.
Layers - Duplicate
Image - Mirror.
5)Layer Palette - Select Bottom Layer.
Layers - Duplicate.
Image - Mirror.
Layer Palette - Lower Opacity to 50.
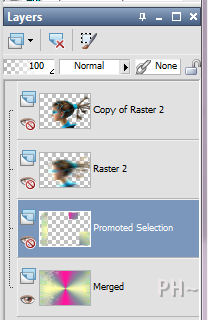
6)Layers - Merge - Merge Visable.
Selections - Load/Save Selections - Load Selection from Disk - Select psppeg_vi1.
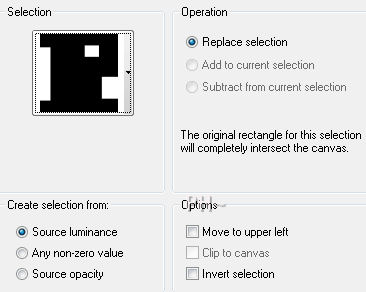
Selections - Promote Selection to Layer.
Selections - Select None.
Layer Palette - Turn off visability of this layer.
7)Layer Palette - Select Top Layer.
Maximize your face tube, Edit - Copy, Close tube, Edit Paste as a New Layer.
Position So the eyes are centered horizontally and the body is centered vertically.
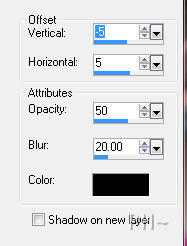
Effects - 3D Effects - Drop Shadow - minus 5, 5, 50, 20.00, black.
Layers Duplicate.
Layer Palette - Select original tube - layer below this one.
Effects - Distortion Effects - Wind - Same Settings.
Repeat Wind but this time from Left.
8)Layer Palette - Select Bottom Layer.
Layers - Merge - Merge Visable. (Your Selection Layer remains invisable.)
Image - Resize - Resize 60%, all layers unchecked.
Layer Palette - Turn on Visability of Top Layer.
Layers - New Raster Layer.
Layers - Arrange - Send to Bottom.
Flood fill white.
9)Layer Palette - Select Top Layer.
Effects - Plugins - Eye Candy 5 - Impact - Extrude - Settings Tab - Large Offset, 30 degrees - Default Settings.
Layer Palette - Select Middle Layer.
Repeat Plugin.
Select Top Layer.
Layers - Merge - Merge Down.
Effects - 3D Effects - Drop Shadow - Same Settings.
10)Layers - Duplicate.
Layer Palette - Select Middle Layer.
Adjust - Blur - Radial Blur.

Effects - Edge Effects - Enhance.
Effects - Plugins - Andrews 06 - A Bit Left Over Gradient.
Effects - Plugins - Andrews 06 - Bits Over the Place - Default Settings..
Effects - Plugins - Mezzo Force.

11)Image - Add Borders - Add a 1 pixel symmetric border in black.
Image - Add Borders - Add a 50 pixel symmetric border in white.
Image - Add Borders - Add a 2 pixel symmetric border in black.
12)Add your watermark
Add text
Layers - Merge - Merge All Flatten.
Image - Resize 800 pixels.
Your done.
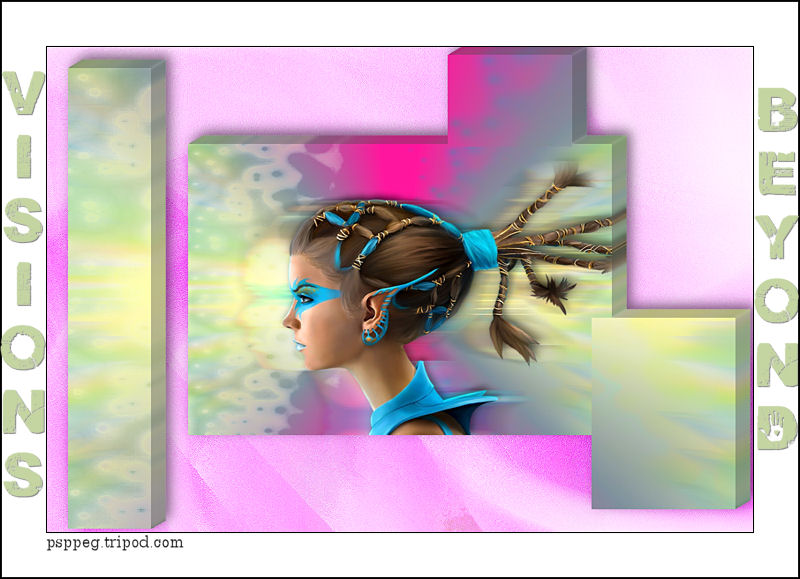
Another Example
Home
©PSPPEG 2011
All Rights Reserved