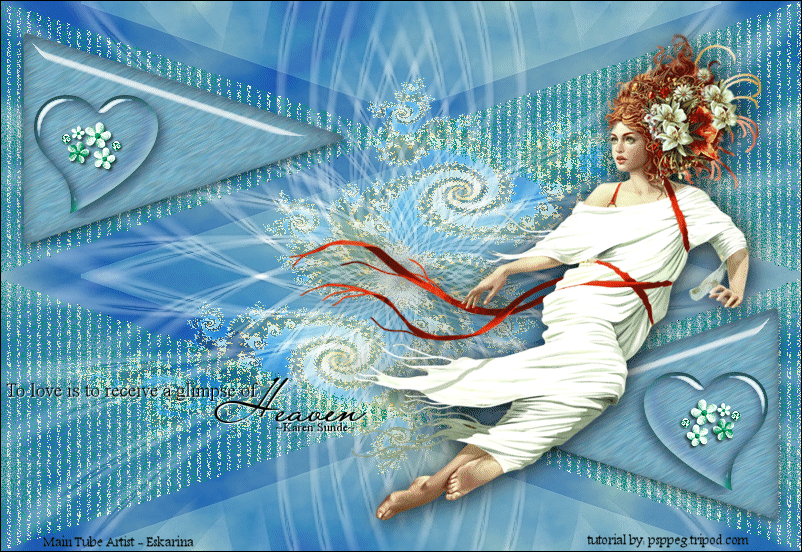
To Love
Abstract ~ Shapes ~ Triangles
This tutorial contains movement in art. What does this mean?
The answer is at the bottom of this tutorial.
Filters Required:
Simple
Mura's Meister - Cloud
AP01 Innovations - Lines
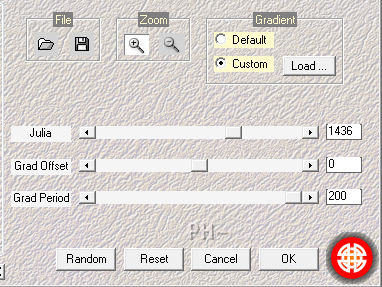
Mehdi - Julia World
Eye Candy 5 - Impact and Textures
Animation Shop
------------------------
Tubes Required:
Main Tube Female
accents
a Mask
Main tube: Artist: Eskarina
Tubed: by Jenny Vrouw
Jen has given permission for her tube to be used in this tutorial.
You can find her beautiful tubes at the link below.
Many Thanks!
------------------------
Materials
------------------------
|
Preparation:
Place the selection in your selection folder.
Double click both Presets, this will place the presets where they need to be.
Open all tubes and mask in your psp program and minimize.
Material Palette - Change your foreground color to #5d8ba7,
and background color to #cfe1b7 or select two colors from your main tube,
a light and medium toned color.
Lets Begin:
A) Background
1)Open a New Image 800 x 550 pixels, white.
2)Effects - Plugins - Mura's Meister - Cloud - Default Settings.

3)Layer - New Raster Layer - Flood fill background color
4)Effects - Plugins - Mehdi - Julia World
4)Layer Palette - Blend Mode: Overlay, Opacity:75.
5)Layers - Merge - Merge Visable
B) Shapes Layer
1)Layers - New Raster Layer
2)Material Palette - Switch Background Color to Foreground - Change Background color to white
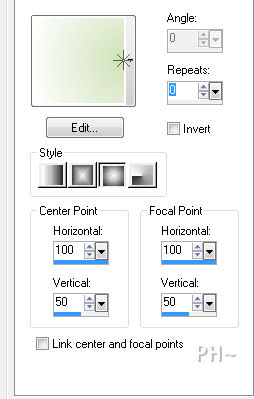
3)Material Palette - Foreground - Select Gradient - Sunburst - Angle and Repeats 0, Horizontal 100, Vertical 50.
4)Flood Fill
5)Effects - Geometric Effects - Perspective Horizontal - Distortion minus 100, Transparent.
6)Layer Palette - Blend Mode: Normal, Opacity: 50.
6)Layers - Duplicate
7)Image - Mirror
8)Layer Palette - Turn off Visability of Bottom Layer - Select top Layer
9)Layers - Merge - Merge Visable
10)Effects - Edge Effects - Enhance
11)Layer Palette - Turn Visability of Bottom Layer Back On.
C) Adding Stripes
1)Magic Wand Tool - Tolerance 20, Feather 0.
2)Select the four outer triangles with your Magic Wand.
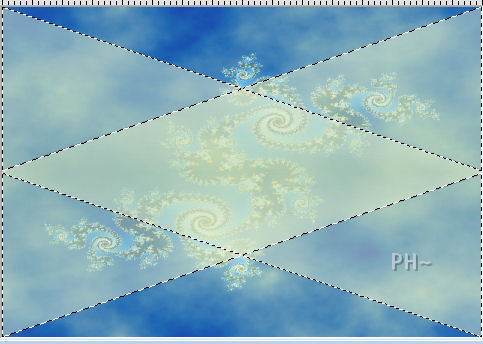
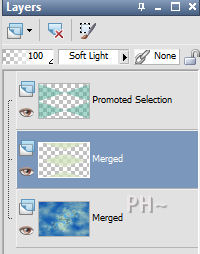
3)Selections - Promote Selections to Layer - Keep Selected
4)Layer Palette - Select Original Layer - Middle Layer - Hit Delete Key on your Keyboard - Then Select - Top Layer
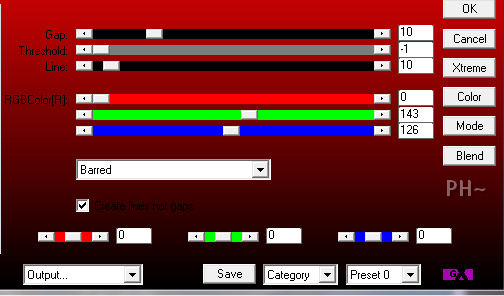
5)Effects - Plugins - AP01 Innovations - Lines Silver Lining - Select Barred - Adjust Settings:
6)Selections - Select None.
D) Adding Diamond Shapes
1)Layer Palette - Select Middle Layer
2)Image - Resize - Resize 80%, All Layers Unchecked
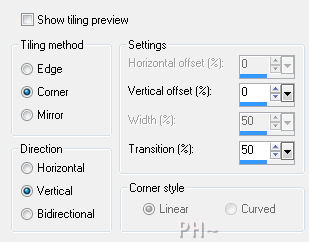
3)Effects - Image Effects - Seamless Tiling.
4)Layer Palette - Blend Mode: Soft Light - Select Top Layer
E) Adding Mask Layer
1)Layers - New Raster Layer
2)Flood Fill White
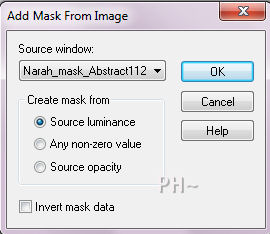
3)Layers - New Mask Layer - From Image - Select Narah_mask_Abstract112 - Source Luminance - Invert Mask Data Unchecked.
4)Layers - Merge - Merge Group
5)Effects - Plugins - Simple - 4 Way Average
6)Effects - Edge Effects - Enhance
F) Adding Elements
1)Layers - New Raster Layer
2)Selections - Load/Save Selection - Load Selection From Disk - Load psppeg_tl1.sel.
3)Material Palette - Change Foreground color to #76acc2
4)Flood Fill with Foreground Color
5)Effects - Plugins - Eye Candy 5 Textures - Texture Noise - Settings Tab: Select psppeg_texnois_tl1
6)Effects - Plugins - Eye Candy 5 Impact - Glass - Settings Tab: Select psppeg_glass_tl1
G) Adding Accents
1)Maximize - FlowerzInHeartz~CS7.psp - Select a colored heart - Freehand Selection Tool - Select around the heart - Edit - Copy - Close Tube - Edit Paste - Paste As a New Layer
2)Mover Tool - Position Heart over Glass Triangle.
3)Layers - Duplicate
4)Image Mirror.
5)Mover Tool - Position over the other glass triangle
H) Adding Main Tube
1)Maximize Jen_Vrouws491_22-08-2011.psp - Edit - Copy - Close Tube - Edit Paste - As New Layer.
2)Image - Resize - Same Settings.
3)Effects - Image Effects - Offset - 125, 0, transparent

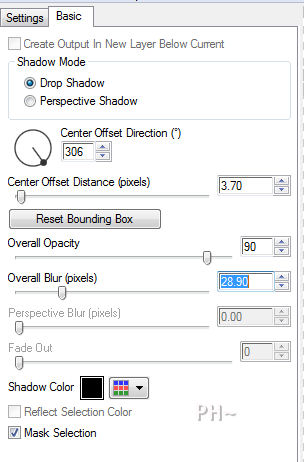
4)Effects - Plugins - Eye Candy 5 Perspective Shadow - Settings Tab: Drop Shadow, Low. Basics Tab: Adjust Overall Blur to 28.90.
J) Adding Text
1)Maximize text_psppeg_tl.psp - Edit - Copy - Close Tube - Edit Paste - As New Layer
2)Mover Tool - Position center of bottom left triangle.
3)Add Watermark. Add text saying: "Main Tube Artist - Eskarina, if using the main tube provided.
K) Animating
1)Open Animation Shop - Minimize to Task Bar - Maximize PSP
2)Holding Shift Key on Keyboard - Hit the D Key Twice. Total of 3 Images.
3)Select One of the Images
4)Layer Palette - Select Layer 3rd from Bottom, titled Promoted Selection - Blend Mode: Dissolve, Opacity: 75.
5)Layers - Merge Merge All
6)Image - Add Borders - Add a 1 pixel symmetric border in color black.
7)Edit - Copy
8)Maximize Animation Shop - Right Click anywhere on background - Paste As a New Animation
9)Maximize PSP - Delete Image
L) Animating - Part Two
1)Select Another of the Images
2)Layer Palette - Select Layer 3rd from Bottom, titled Promoted Selection - Blend Mode: Dissolve, Opacity: 55.
3)Layers - Merge Merge All
4)Image - Add Borders - Add a 1 pixel symmetric border in color black.
5)Edit - Copy
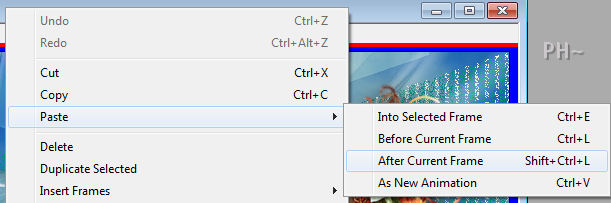
6)Maximize Animation Shop - Right Click title of first frame - Paste - After Currant Frame
7)Maximize PSP - Delete Image.
8)Repeat Step K 1 to 7 on the remaining image - Except Change Opacity to 25 instead of 55.
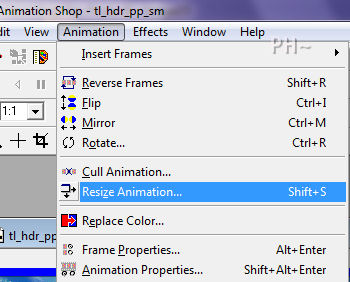
9)Animation Shop - Edit Select All - Animation - Resize Animation.
10)Save As
Your done. Hope you enjoyed it!
The answer to the question what is floating in art: It is the combination of lines and animation. This creates the idea of floatation.
Another Example

Home
©PSPPEG 2011
All Rights Reserved