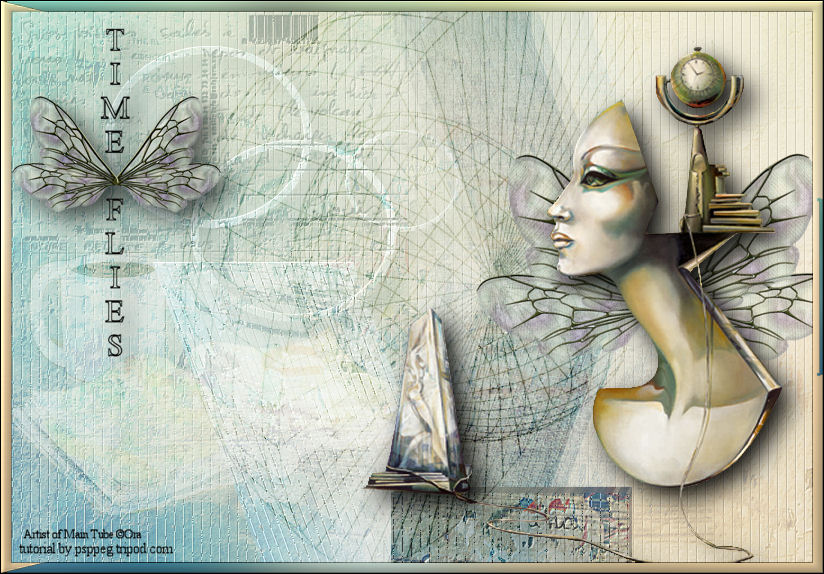
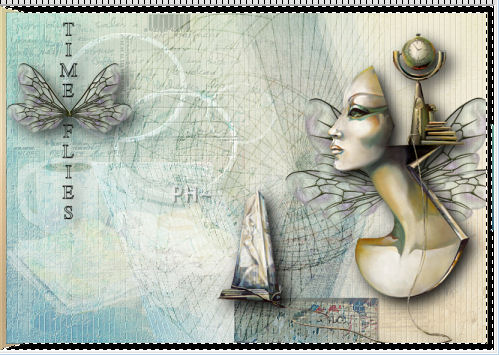
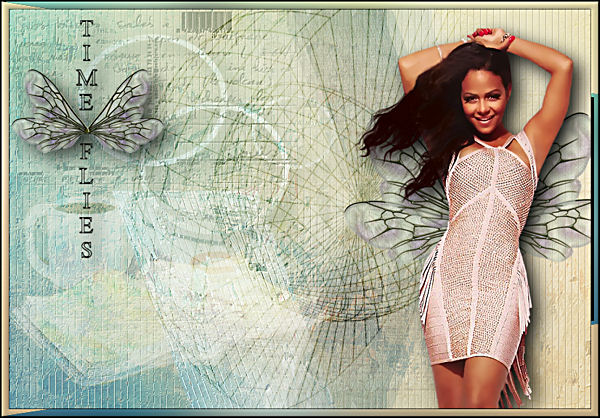
Time Flies
Abstract ~
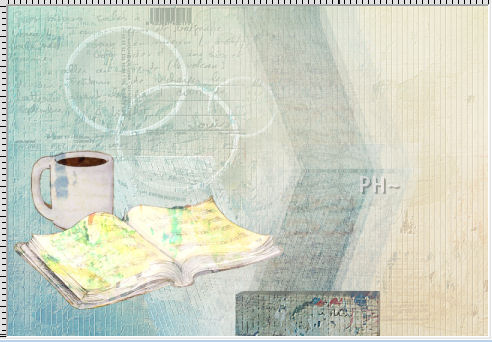
This Tutorial Contains a collage. What does this mean?
The answer is at the bottom of this tutorial.
Filters Required:
Two Moon - Wish it would rain
FM Tile Tools - Blend Emboss
Eye Candy 5 Impact
Toadies - What are you
------------------------
Tubes Required:
Main Tube Female (Can be changed)
Elements and text
and Selections
The Tube's artist is ©Ora and the tube was provided by kikirou with permission.
You can find kikirou's group below. The tubes are beautiful!
Many Thanks Kikirou!
------------------------
Materials
------------------------
|
Preparation:
Place Selections in your PSP Selections file.
Open all tubes, text and elements in your psp program and minimize.
Material Palette - Place #d4c6a7 as foreground color and #ffffff as background color.
Lets Begin:
A) Background
1)File, New Image, 800wx550h, transparent.
Flood fill foreground color.
B) Texture
1)Layers - New Raster Layer
2)Selections - Select All
3)Maximize texture_timefl_pp.jpg - Right click title - Copy - Right click title of working image - Paste - Paste Into Selection - Minimize
4)Selections - Select None.
5)Effects - Plugins - Two Moon - Wish it Would Rain - Default Settings.

6)Effects - Plugins - FM Tile Tools - Blend Emboss - Default Settings.
7)Layer Palette - Blend Mode: Multiply, Opacity: 100.
C) Selection Layer
1)Selections - Load/Save Selection - Load Selection From Disk - psppeg_tf1.sel
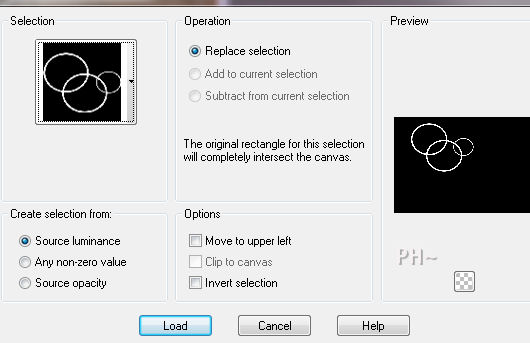
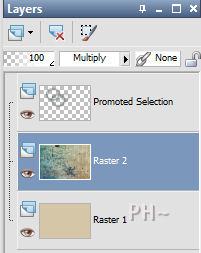
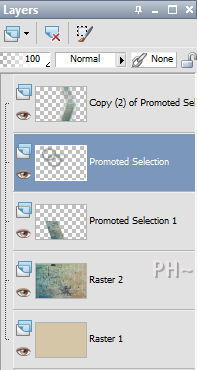
2)Selections - Promote Selection to Layer
3)Selections - Select None
4)Effects - Plugins - Eye Candy 5 Impact - Perspective Shadow - Settings Tab: Drop Shadow, Blurry - Default Settings.
D) Background Element
1)Layer Palette - Select Raster 2
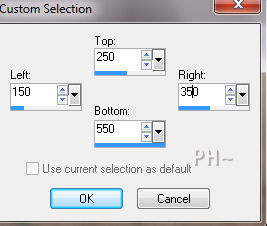
2)Selections Tool - Selection - Custom Selection - 150,250,350,550.
3)Selections - Promote Selection to Layer
4)Selections - Select None
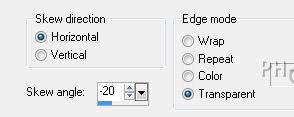
5)Effects - Geometric Effects - Skew - Settings: Horizontal, Skew Angle minus -20, transparent.
E) Background Element Two
1)Layers - Duplicate
2)Image - Mirror
3)Image - Flip
4)Effects - Plugins - Toadies - What Are You - Default Settings.
5)Layers - Duplicate
6)Image - Flip.
7)Layers - Merge - Merge Down
8)Layer Palette - Blend Mode: Normal, Opacity 50.
8)Layers - Arrange - Bring to Top
F) Blend Layer
1)Layer Palette - Select Layer Second to Top
2)Layers - New Raster Layer
3)Selections - Select All
4)Maximize texture_timefl_pp.jpg - Right click title - Copy - Right click title of working image - Paste - Paste Into Selection
5)Selections - Select None.
6)Adjust - Blur - Gaussian Blur - Radius: 35.
7)Layer Palette - Blend Mode: Screen, Opacity: 90.
G) Blend Layer - Two
1)Layer Palette - Select Top Layer
2)Layers - New Raster Layer
3)Flood Fill - Background Color
4)Layer Palette - Blend Mode: Soft Light, Opacity: 75.
H) Element One
1)Maximize element1_psppeg_tf.psp - Edit - Copy - Close tube - Edit - Paste as a New Layer.
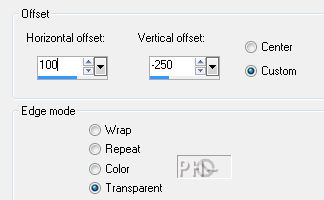
2)Effects - Image Effects - Offset - 100, minus -250, transparent.
J) Element Two
1)Maximize element2_psppeg_tf.psp - Edit - Copy - Close tube - Edit - Paste as a New Layer.
2)Mover Tool - Position under the three rings and to the left.
3)Layer Palette - Blend Mode: Soft Light, Opacity: 100.
K) Element Three
1)Maximize element3_psppeg_tf.psp - Edit - Copy - Close tube - Edit - Paste as a New Layer.
L) Wings
1)Maximize obdft193.psp - Edit - Copy - Close tube - Edit - Paste as a New Layer.
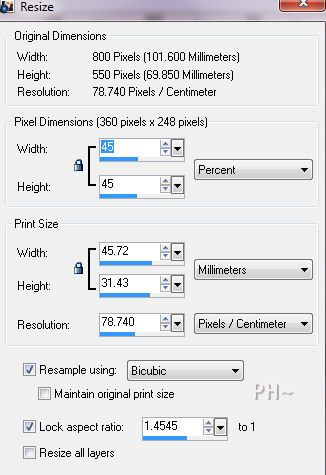
2)Image - Resize 45%, all layers unchecked.
3)Layers - Duplicate
4)Image - Mirror
5)Mover Tool - Position so that both black areas meet

6)Layers - Merge - Merge Down.
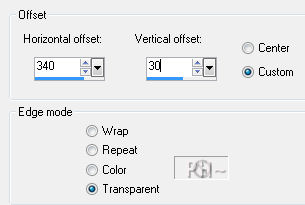
7)Effects - Image Effects - Offset - 340, 30, transparent.
M) Main Figure
1)Maximize kikirou1648-ora time keeper.psp - Edit - Copy - Close tube - Edit - Paste as a New Layer.
2)Effects - Image Effects - Offset - 160, minus 20, transparent.

3)Effects - Plugins - Eye Candy 5 Impact - Perspective Shadow - Settings Tab: Drop Shadow, Blurry - Default Settings.
N)Text
1)Maximize text_psppeg_tf.psp - Edit - Copy - Close tube - Edit - Paste as a New Layer.
2)Mover Tool - Position Top Left Corner
3)Effects - Plugins - Eye Candy 5 Impact - Perspective Shadow - Settings Tab: Drop Shadow, Blurry - Default Settings.
P)Borders
1)Layer Palette - Scroll Down to the Layer: Raster 3 - Select - Edit - Copy
2)Layers - Merge - Merge All
3)Image - Add Borders - Add a 1 pixel Symmetric Border in #000000.
4)Image - Add Borders - Add a 10 pixel Symmetric Border in white.
5)Magic Wand Tool - tolerance and feather 0 - Select White Border
6)Layers - New Raster Layer
7)Edit - Paste - Paste Into Selection
8)Layers Duplicate
9)Image - Mirror
10)Effects - Geometric Effects - Horizontal Perspective - Distortion: 45. Color.

11)Selections - Select None
12)Magic Wand Tool - Select the Black - Hit your Delete Key
13)Selections - Select None.
14)Layer Palette - Select Bottom Layer
15)Magic Wand - Select the same border
16)Layers - Merge - Merge All
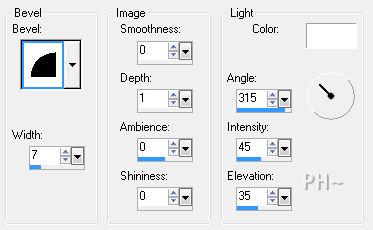
17)Effects - 3D Effects - Inner Bevel
18)Selections - Select None.
19)Image - Add Borders - Add a 2 pixel Symmetric Border in your foreground color.
12)Add your watermark
Your done.
The answer to the question what is a collage: A Collage is a blend of images blended together to form an idea.
Many artists use magazine clippings to create collages. By the way, clippings from magazines are often used in art. Tubes taken from
magazines such as female models etc. are clippings. Thus use them without fear of infringing copywrite.
Another Example
Home
©PSPPEG 2011
All Rights Reserved