Nature Swirls
Filters Required:
Simple
FM Tile Tools
Xero Clarify
------------------------
Tubes Required:
Main Tube Female
Misted Garden
Butterfly Swirl
------------------------
or use the Ones Used Here
------------------------
Which include:
JHanna222_tube Tube created by Johanna and has given us permission to use her tube, Thank you! It can be at Link is Here
GINATUBES_DIVERS_323, the Misted Garden tube was created by Gina which can be found Here
The rest of the tubes were found during online travels.
|
Preparation:
Open all tubes and jpegs in your psp program and minimize.
Select two colors from your main tube. We used #e08b8d foreground, #8f8ea7 background.
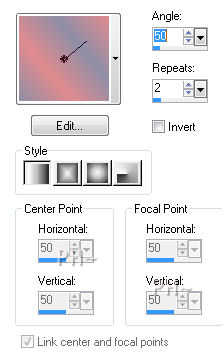
Set your foreground to gradient, foreground/background, Angle 50, Repeat 2, Style Linear
File, New Image, 800wx600h, transparent.
Flood Fill with Gradient
Lets Begin:
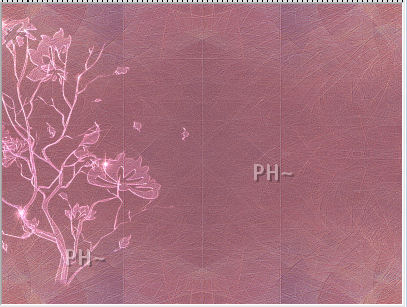
1)Layers-New Raster Layer. Selections-Select All
Maximize Apophysis-27. Edit - Copy. Close jpeg. Edit - Paste Into Selection. Selections - Select None.
Layer Palette - Change Blend Mode to Soft Light.
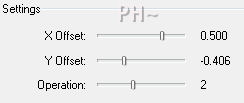
Effects - Plugins - FM Tile Tools Collage - Circular - Settings 0.500/-0.406/2
Effects - Plugins - FM Tile Tools - Blend Emboss Default Setting.
Repeat
Layers - Merge - Merge Visable.
Effects - Plugins - Simple - 4 Way Average
Repeat FM Tile Tools - Blend Emboss
2)Maximize a_052611, the tree. Edit - Copy. Close tube. Edit - Paste as a New Layer.
Move to the left.
Take your eraser tool, with the following settings, and remove the bottom of the tree by clicking one time with the eraser.

Layer Palette - Change Blend Mode to Dodge and lower the Opacity to 53.
3)Maximize TURKIS by Mago74 elem (24).psp, Edit - Copy. Close tube. Edit - Paste - as a New Layer.
Image - Mirror
4)Layers - New Raster Layer. Selections - Select All.
Maximize GINATUBES_DIVERS_323, Edit - Copy. Close tube. Edit - Paste Into Selection.
Selections - Select None.
Layers Palette - Change Blend Mode to Soft Light
Effects - Plugins - FM Tile Tools - Blend Emboss default settings.
Effects - Plugins - Xero - Clarity - Default Settings
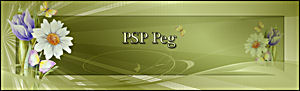
5)Maximize psppeg_swirls, Edit - Copy. Close tube. Edit - Paste - as a New Layer.
Position to the right center, touching the edge of the image border.
6)Layers - Merge - Merge All Flatten
Image - Add Borders. Add a 2 pixel symmetric border in a darker color of the mixed color of your background. We used #82484f.
Image - Add Borders a 2 pixel symmetric border color white #ffffff, and another border 2 pixels symmetric in #82484f.
Layers - Promote Background to Layer.
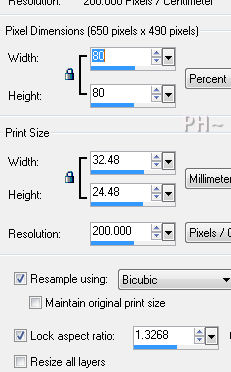
Image - Resize - 80%.All layers Unchecked.
Adjust - Sharpen - Sharpen.
Layers - New Layer. Layers - Arrange - Send to Bottom. Flood fill with color white #ffffff.
Layers - Merge - Merge All Flatten.
Image - Add Borders - 2 pixels symmetric border in color #82484f.
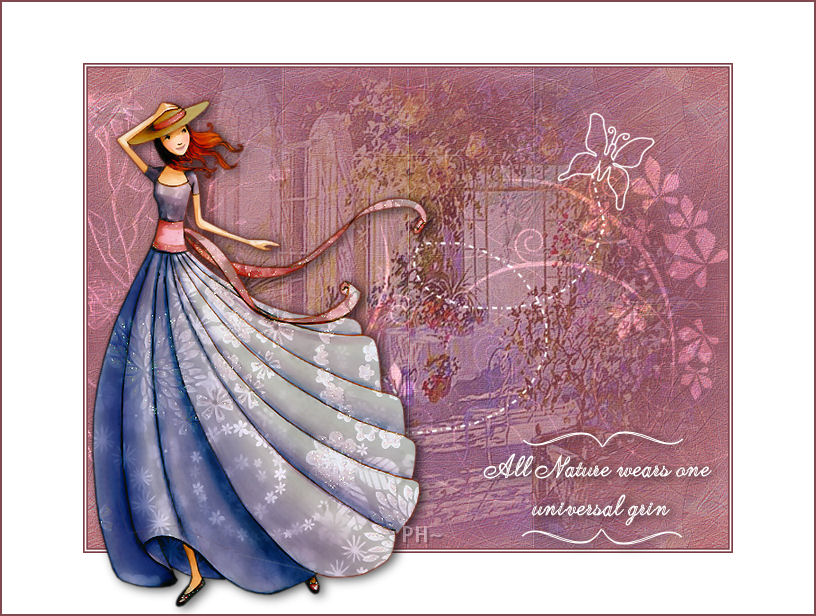
7)Maximize JHanna_222_tube, Edit - Copy. Close tube. Edit - Paste - as a New Layer.
Image - Resize - Same settings as before except change 80% to 90%.
Position to the left almost touching the inner border.
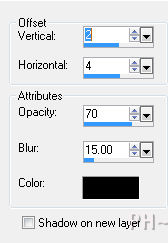
Effects - 3D Effects- Drop Shadow - Settings 2,4,70,15.
8)Maximize psppeg_swirlstext, Edit - Copy. Close tube. Edit - Paste as a New Layer.
Effects - 3D Effects - Drop Shadow - same settings as before.
Layers - Merge - Merge All Flatten.
Add your watermark. Your Done.
Home
©PSPPEG 2011
All Rights Reserved