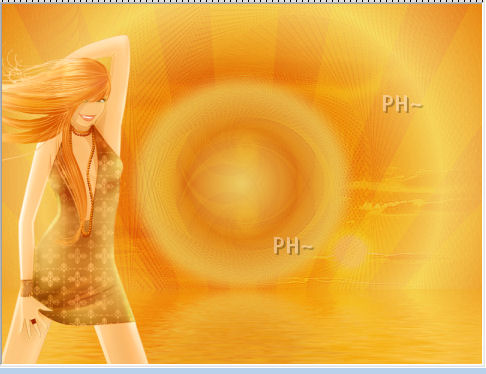
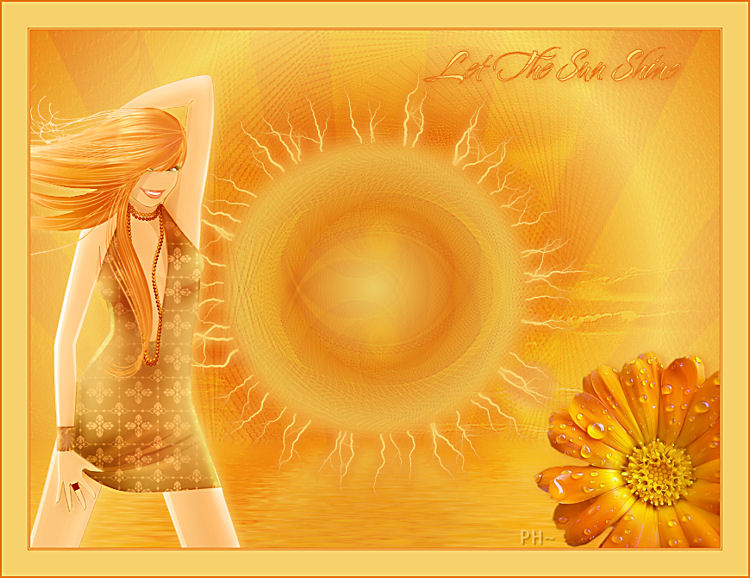
Let The Sun Shine


Filters Required:

Eye Candy 5 Impact - Perspective Shadow

Simple

Xero Clarity

Flaming Pear Flood

Alienskin Xenoflex 2 - Electrify

FM Tile Tools Blend Emboss

------------------------
Tubes Required:

Main Tube Female

Misted Sunset

Flower

------------------------
or use the Ones Used Here

------------------------
Which include:

VIKIFLOKISEPTIEMBRE which was found at the group Flower Power Partage TubesLink is Here
Chouchoucats82's_Tubes_Fleurs4_Avril_2011 which was also found at the above group
ketlandscape039 which was also found at the above group

Narah_mask_Abstract111 which was found at the above group and was posted by Narah, Thank you

Preparation:


Open all tubes and masks in your psp program and minimize.
Select two colors from your main tube. We used #f7d16b foreground, #e57615 background.

Set your foreground to gradient, foreground/background, Angle 0, Repeat 2, Style Sunburst Horizontal and Vertical 50.

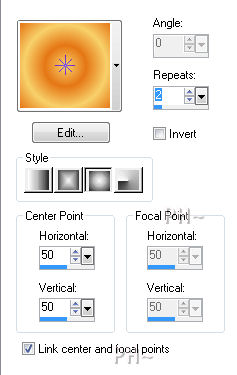
File, New Image, 800wx600h, transparent.
Flood Fill with Gradient

Lets Begin:

1)Layer, New Raster Layer. Selections, Load Selections Load psppegss1.sel. Change foreground back to color. Flood fill each section, starting with bottom left corner with #f7d16b.

Selections, Select None.
Layer Palette, set the Blend Mode to Soft Light and lower the opacity to 70.

2) Layer, New Raster Layer. Maximize ketlandscape039. Edit Copy, close out tube, Edit Paste as a New Layer on the working canvas.
Plugins, FM Tile Tools, Blend Emboss, default settings.
Layers Palette, set the Blend Mode to Soft Light.
Effects, Plugins, Xero, Clarity, Default Settings.

3) Layer, New Raster Layer.
Selections, Load Selections, Load psppegss1a.sel. Flood fill with gradient.Select None.
Effects, Plugins, FM Tile Tools, Blend Emboss.

4) Layer, New Raster Layer. Flood fill with your foreground color. Layers, New Mask Layer, From Image. Find Narah_mask_Abstract111.jpg. Only Source Luminance selected. Apply. Layers, Merge, Merge Group. Effects, Edge Effects, Enhance.
Layers Palette, set the Blend Mode on Soft Light and set the Opacity to 70.
Layers, Duplicate. Image, Flip.
Layers, Merge, Merge Visable. Effects, Plugins, Flaming Pear, Flood. Change the color to #f8c30c and set Horizontal at 80.

5) Layer, New Raster Layer. Selections, Load Selections, Load psppegss1a.sel.
Effects, Plugins, Alienskin Xenoflex 2, Electrify. On the basic tab change the Arc Spacing to 25.61 and the Arc Thickness to 43. On the Glow Tab change the Inner Color to #f7d16b and the Outer Color to #e57615. Selection, select none.
 

6)Maximize VIKIFLOKISEPTIEMBRE. Edit copy, close tube. Edit Paste as a New Layer on your working canvas. Image, Mirror. Move to the left.

Effects, 3D Effects, Drop Shadow. 2,4,70,15 color #e57615.

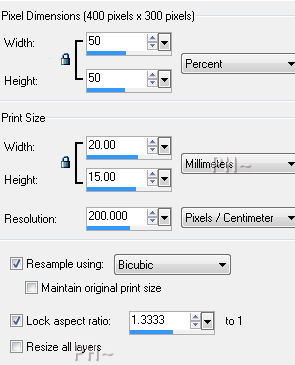
7) Maximize Chouchoucats82's_Tubes_Fleurs4_Avril_2011.psp. Edit copy, close tube. Edit paste as a New Layer. Image, Mirror. Image Resize, 50%, all layers unchecked. Position bottom right in the very corner.
Add the same drop shadow.

8) Layers, Merge, Merge Visable. Change your colors around. Foreground #e57615, Background #f7d16b. Select your Text Tool, Select a fun font, size 48, stroke 1, Create as Vector. Type a saying. We typed Let the Sun Shine. Place upper Left corner.

Layers, Layer Convert to Raster. Add the same drop shadow.

9) Layers, Merge All Flatten. Image, Add Borders. Add a Symmetric 1 pixel border in your foreground color. Another 1 pixel border in your background color, and 1 pixel border in the dark color.
Image, Add Borders, 30 color #f7d16b. Image Add Borders, 2 pixels color #e57615.
Add your watermark. Your Done.      

Home


©PSPPEG 2011

All Rights Reserved