
Rosy Shades of Tranquility
Filters Required:
Mura Meister - Copies
Italian Editor Effects - Effecto Fantasma
If you need a filter..select the linked image below and scroll down the page.

------------------------
Tubes Required:
Main Tube by Guismo
Landscape LuzChristina
Sév_Guismo has provided psppeg with permission to use the tubes provided in this tutorial.
To view more Fantastic Tubes by the Tuber Sév_Guismo click image below.

Many Thanks Sev
------------------------
Materials
------------------------
|
Preparation:
Look thru the list of filters and make certain you have them.
Open all tubes in your psp program and minimize.
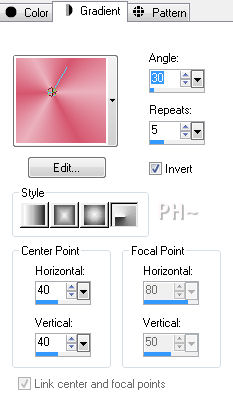
Material Palette - Set foreground to#cc345d and background to #e8a0b4 or select one medium color and a lighter value of the same color to work with.
Set Foreground to Gradient - Style Radial, Gradient Foreground/Background, Angle 30, Repeats 5, Horizontal and Vertical 40 Invert checked.
Lets Begin:
A)Background
1)File, New Image, 750wx550h, transparent.
2)Flood Fill with Gradient.
3)Maximize element1_psppegtra.psp - Edit - Copy - Close tube - Edit - Paste - Paste as a New Layer
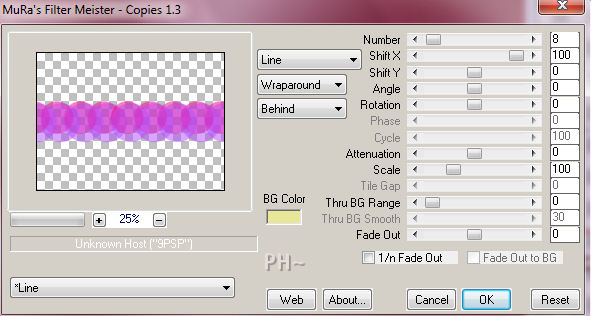
4)Effects - Plugins - Mura Meister - Copies - Select Line - Number 8
5)Layers - Merge - Merge Down
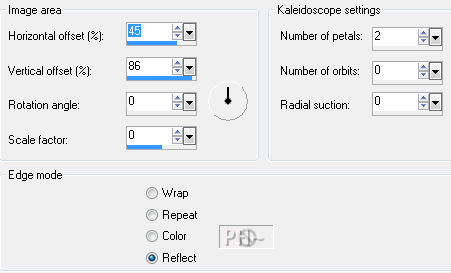
5)Effects - Reflection Effects - Kaleidoscope
B)Background Design Layer
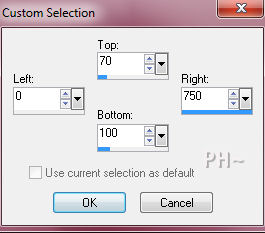
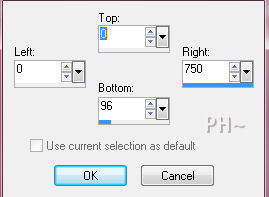
1)Selection Tool - Custom Selection - Top 70, Right 750, Bottom 100, Left 0.
2)Selections - Promote Selection to Layer
3)Selections - Select None
4)Effects - Texture Effects - Weave
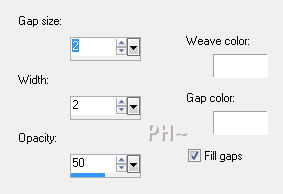
5)Effects - Plugins - Italian Editors Effect - Effetto Fantasma - 22, 7.
6)Layers - Duplicate
7)Image - Flip
8)Layers - Merge - Merge Down
9)Layers - Duplicate
10)Image - Rotate - Free Rotate - Left, 90 Degrees, all layers unchecked
Selection Tool - Custom Selection
Hit Delete Key, Selections - Select None
11)Repeat Step 10) except change top to 455, Bottom to 550.
12)Layers - Merge - Merge Down
14)Layer Palette - Blend Mode - Multiply, Opacity: 75
15)Layer Palette - Rename this Layer: Frame
C)Bubbles Layer
1)Layers - New Raster Layer
2)Selections - Select All
3)Maximize Element2_psppegtra.psp - Edit - Copy - Edit Paste - Paste Into Selection
4)Selections - Select None
5)Layer Palette - Blend Mode: Luminance Legacy, Opacity: 35
6)Layers - Duplicate
7)Image - Mirror, Image - Flip
D)Accent Tube 1
1)Maximize windchimestarryorbcas.psp - Edit - Copy - Edit - Paste - As a New Layer
1)Effects - Image Effects - Offset - 290, 25, transparent
2)Layer Palette - Blend Mode: Overlay
3)Layers - Duplicate
4)Image - Mirror
E)Scenery
1)Layer Palette - Go to the Frame Layer
2)Magic Wand Tool, Feather and Tolerance 0 - Select Center of Image
Layer Palette - Select Layer below top layer
3)Maximize 2703-luzcristina.psp - Edit - Copy - Close image - Edit - Paste As a New Layer.
4)Selections - Invert - Hit Delete Key
5)Layer Palette - Blend Mode: Luminance Legacy, Opacity: 42
F)Side Panel Layer
1)Layer Palette - Go to the Frame Layer
2)Magic Wand Tool - Select the two outer sections where the chimes are
3)Layer Palette - Select Bottom Layer
4)Selections - Promote Selection to Layer
3)Effects - Texture Effects - Weave - Same Settings
4)Layer Palette - Blend Mode: Overlay, Opacity: 70
5)Brush Tool - Find Brush Tip ppzigzag
6)Change Foreground Color to #841226
7)Layers - New Raster Layer
8)Stamp the brush directly over the left Panel
9)Layers - Duplicate
10)Image - Mirror
G)Main Tube and Drop Shadow
1)Maximize calguisglamour5910.psp - Edit - Copy - Edit - Paste - Paste As a New Layer
2)Image - Resize - 70%, all layers unchecked
3)Mover Tool - Position to the left over the center vertical frame
4)Effects - 3D Effects - Drop Shadow - minus 7, plus 7, 50, 20.00, color #440417
5)Repeat Drop Shadow reversing the plus and minus.
6)Layer Palette - Select Frame Layer
7)Repeat the same two drop shadows.
J)Framing
1)Layers - Merge - Merge All
2)Image - Add Borders - 1 pixels symmetric border - with #841226.
3)Layers - Promote Background to Layer
4)Image - Resize 90%, all layers unchecked
5)Layers - New Raster Layer
6)Layers Arrange - Send to bottom
7)Flood Fill with original gradient
8)Effects - Reflection Effects - Repeat Kaleidoscope
9)Layer Palette - Select Top Layer
10)Repeat Drop Shadow switching the plus and minus.
11)Image - Add Borders - 2 pixel symmetric border in #841226.
K)Finalizing
1)Add your watermark
2)Add text
3)Layers - Merge - Merge All Flatten.
Your done.
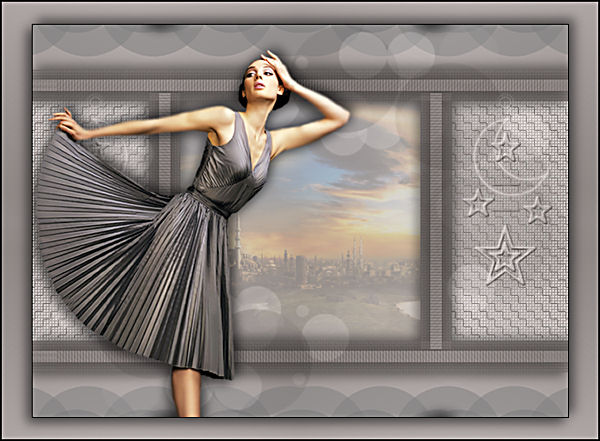
Another Example
Home
©PSPPEG 2011
All Rights Reserved