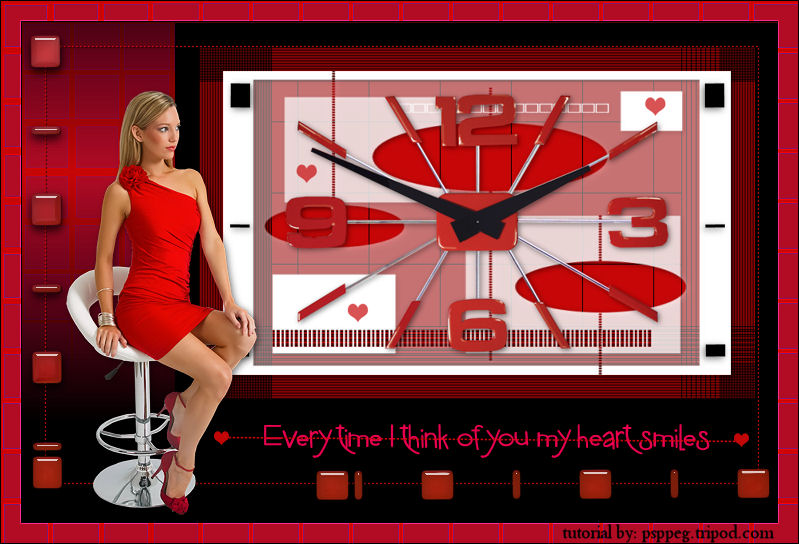
Every Time
This is a Retro Tutorial...going back to the 50s
Filters Required:
FF M - Loom
FF C - The Grid 2
If you need a filter..select the linked image below and scroll down the page.

------------------------
Tubes Required:
Main Tube Female
Main Tube Clock
elements
a Mask
Claudia has given me Permission to use her tubes.
Many Thanks Claudia!
------------------------
Materials
------------------------
|
Preparation:
Look thru the list of filters and make certain you have them.
Open all tubes and mask in your psp program and minimize.
Material Palette - Set foreground to #c60607, background to black. Set Foreground to Gradient -
Style Linear, Gradient Foreground/Background, Angle 180, Repeats 1, Invert checked.
Colors Used

Lets Begin:
A)Background
1)File, New Image, 755wx500h, black.
2)Layers - New Raster Layer.
3)Flood fill with gradient
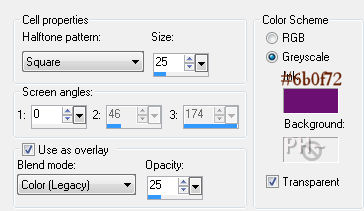
4)Effects - Artistic Effects - Halftone
5)Effects - Edge Effects - Enhance
6)Effects - Image Effects - Offset - 0, 100, transparent.
7)Minimize for now
B)Clock
1)File - New Image - Same Settings
2)Layers - New Raster Layer
3)Material Palette - Change Foreground from Gradient back to Solid Color.
4)Flood Fill Layer.
5)Selections - Select All
6)Selections - Modify - Contract - 30 pixels
7)Selections - Invert - Hit your delete key on your keyboard
8)Selections - Select None
9)Effects - Plugins - Filter Factory M - Loom

10)Magic Wand Tool - Feather 0, Tolerance 24 - Select the center red square
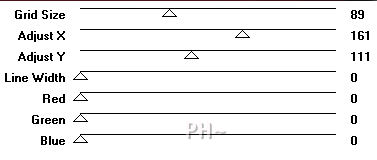
11)Effects - Plugins - Filter Factory C - The Grid 2
12)Selections - Select None
C)Clock Part 2
1)Layer - New Raster Layer
2)Selections - Select All
3)Selections - Modify - Contract - 60 pixels (keep selected)
4)Flood Fill White.(keep selected)
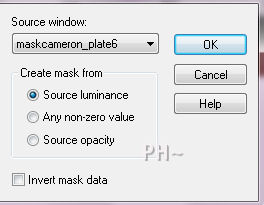
5)Layers - New Mask Layer - From Image - Select maskcameron_plate6
6)Selections - Select None
7)Layers - Merge - Merge Group
8)Effects - 3D Effects - Drop Shadow - 2, 2, 50, 10, black.
9)Maximize tubeclaudiaviza-mix105.psp - Edit - Copy - Close image - Edit - Paste As a New Layer.
10)Image - Resize - 60%, all layers unchecked
11)Effects - 3D Effects - Drop Shadow - Same Settings
12)Maximize hearts1_element_psppeg.psp - Edit - Copy - Close image - Edit - Paste As a New Layer.
14)Mover Tool - Move the Hearts up just a bit
12)Layers - Merge - Merge Visable - Edit Copy
D)Placing the Clock
1)Maximize your Image you created earlier
2)Edit - Paste - Paste As a New Layer
3)Image - Resize - 80%, all layers unchecked
4)Mover Tool - Position Top Right so that the black edges touches the canvas sides
E)Element 2
1)Maximize element2_psppeg5t.psp - Edit - Copy - Close image - Edit - Paste As a New Layer.
F)Creating Element 3
1)Pen Tool - Following Settings

2)Material Palette - Change Foreground to Black - null background
3)Starting at the top of the White Side Border on the Clock place your first node
Pull down holding the Shift key and place the bottom node at the bottom of the clock
4)Layers Convert to Raster
5)Effects - Image Effects - Drop Shadow - Same Settings
6)Layers - Duplicate
7)Mover Tool - Move to the right side - white space
G)Adding The Main Tube
1)Maximize tubeclaudiaviza_mujer2092.psp - Edit - Copy - Close image - Edit - Paste As a New Layer.
2)Image - Resize - 50%, all layers unchecked
3)Adjust Sharpen - Sharpen
4)Effects - 3D Effects - Drop Shadow - Same Settings
H)Adding Text
1)Maximize Every Time I think of you....psp - Edit - Copy - Close Tube - Edit - Paste - Paste As a New Layer.
2)Adjust - Brightness/Contrast - Brightness 119, Contrast 0
3)Adjust - Hue and Saturation - Colorize - Hue 241, Saturation 255
4)Mover Tool - Position Evenly Spaced Below the Clock
5)Pen Tool - Same Settings except change size to 2.00 and line to Dot
6)Draw a line Going over your words but extending beyond
7)Maximize heart2_psppeg.psp - Edit - Copy - Close Tube - Edit - Paste -
Paste as New Selection - Place two Hearts at each end of the line you drew
8)Selections - Select None
J)Framing
1)Layers - Merge - Merge All
2)Image - Add Borders - 1 pixel symmetric border - Black #000000.
3)Image - Add Borders - 20 pixels symmetric border - #c60607.
4)Magic Wand Tool - Same Settings - Select the White Border
5)Effects - Artistic Effects - Half Tone - Same Settings
6)Effects - Edge Effects - Enhance More
7)Selections - Select None.
8)Image - Add Borders - 1 pixel symmetric border - Black #000000.
K)Finalizing
1)Add your watermark
2)Layers - Merge - Merge All Flatten.
Your done.
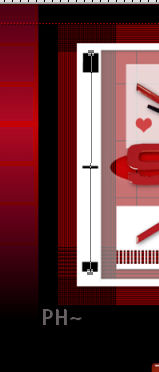
Another Example

Home
©PSPPEG 2011
All Rights Reserved