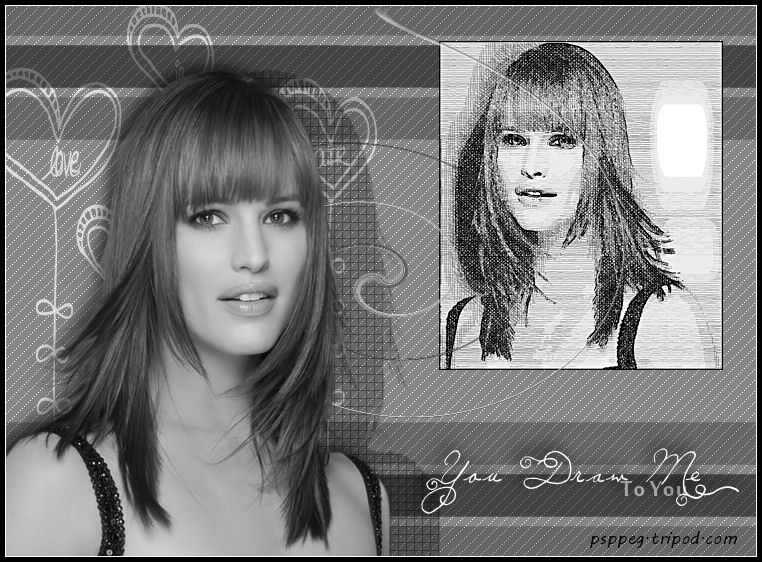
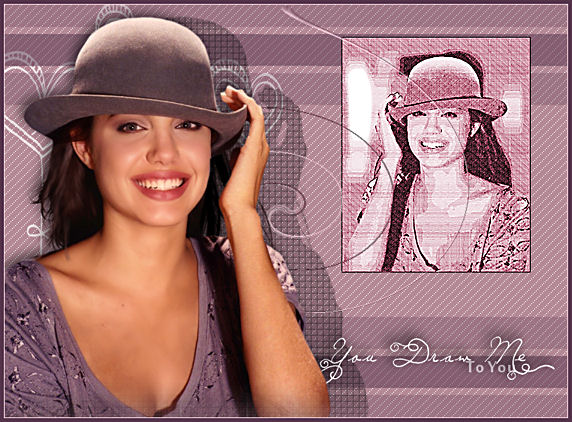
You Draw Me
Uses a Stand Alone Free Program
Filters Required:
Eye Candy 5 Impact - Chrome
AP01 Innovations- Lines - Silver Lining
Toadies - What are You
Foto Sketcher Here
------------------------
Tubes Required:
Main Tube Female
Draw Me Text
Draw Me Brush
------------------------
Materials
------------------------
|
Preparation:
Open all tubes in your psp program and minimize.
1)First we need to create the sketch.
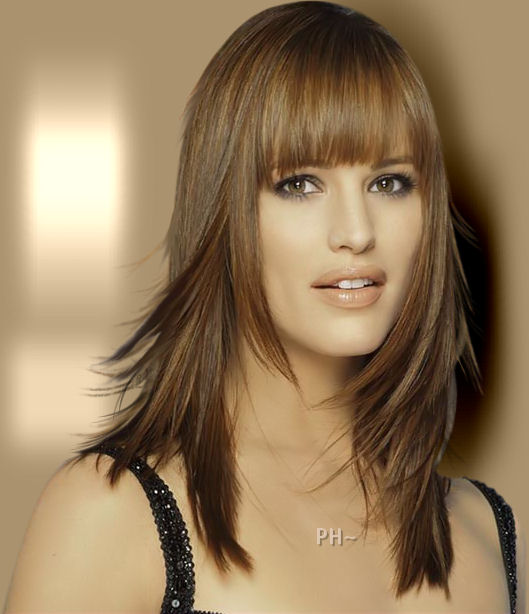
Maximize the tube Dani@1503
Edit - Copy tube - Edit - Paste - As a New Image. Minimize original.
2)Layers - New Raster Layer.
Layers - Arrange - Send to Bottom.
Change foreground color to #aa926f, a color from your tube.
Flood fill.
Tools Palette - Lighten/Darken Brush - square, 124, 50, 10, 100, 0, 100

Lighten background to the left with a few brush marks, Darken right background by holding down the right mouse button.
3)Layers - Merge - Merge All Flatten.
File - save as jpg. (Save to a place you can locate quickly. We save to Desktop.)
Open Portable Foto Sketcher.
4)File (top left corner) - Open a picture - find the image you just created as a jpg.
A palette opens with your picture.
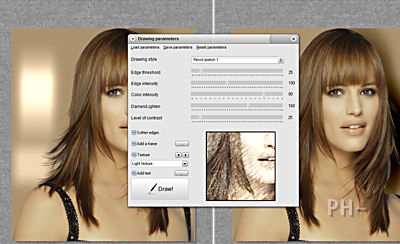
5)Drawing style - select from the drop down - Pen & ink sketch 1 - other settings 47, 139, 118. Hit draw.
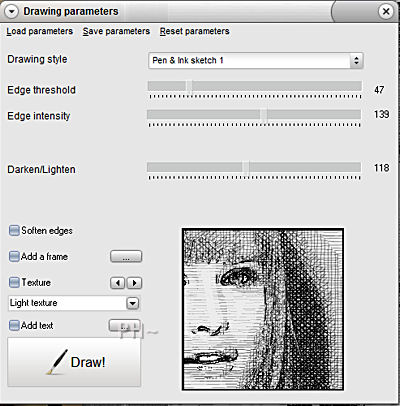
File - save as
Close Program
Back to Psp
File - Open - Open your image you just saved. Minimize.
6)File, New Image, 750wx550h, transparent.
Select two colors from your main tube. We greyscaled and used #878787 foreground, #000000 background.
Flood Fill foreground color
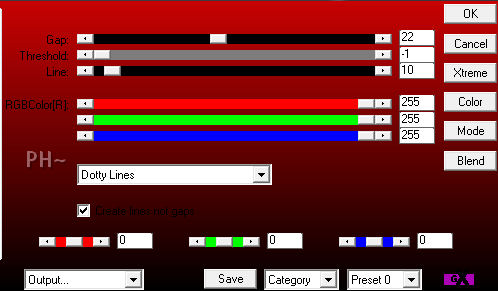
Effects - Plugins - AP 01, Lining, Silver Lining - Settings: Drop down Dotty Lines, 22, -1, 10, 255, 255, 255.
7)Maximize draw_psppeg_hearts - Edit - Copy - Close image - Edit - Paste - As a New Layer.
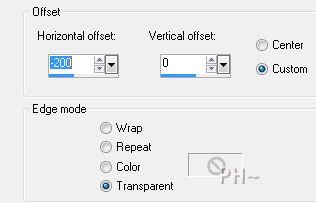
Effects - Image Effects - Offset -200, 0, transparent.
Layer Palette - Lower Opacity to 70.
8)Layers - New Raster Layer.
Selections - Load/Save Selections - Load psppeg_ydm1.sel.
Flood fill with background color.
Selections - Select None.
Effects - Plugins - Toadies What are You - Settings 141, 25. Repeat.
Layers - Duplicate. Image - Flip.
Layers - Merge - Merge Visable.
9)Maximize your sketch
If it is quite large, resize.
Image - Add Borders - 2 pixel symetric border in background color.
Edit - Copy - Close image - Edit - Paste - As a New Layer.
Image - Resize - to 400 pixels, all layers unchecked.
Image - Mirror
Adjust - Sharpness - Unsharpen Mask - 2.00, 50, 5.
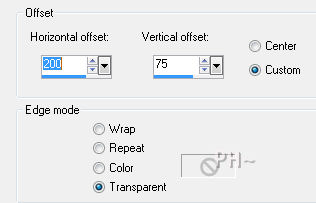
Effects - Image Effects - Offset - Settings: 200, 75, custom, transparent.
10)Maximize Dani@1503. Edit - Copy - Close tube - Edit - Paste as a New Layer.
Effects - Image Effects - Offset - Settings: -150, -35, transparent.
Layers - Duplicate.
Effects - Image Effects - Offset - Settings: -50, 0, transparent.
Adjust - Hue and Saturation - Saturation 0.
Effects - 3D Effects - Drop Shadow -6, -6, 65, 20.00, color #000000.
11) Layer Palette - Select layer Raster 2, your Dani@1503 tube original.
Adjust - Brightness/Contrast - Settings: Brightness -255. (Contrast is not affected.)
Adjust - Brightness/Contrast - Settings: Brightness 139, Contrast 31.
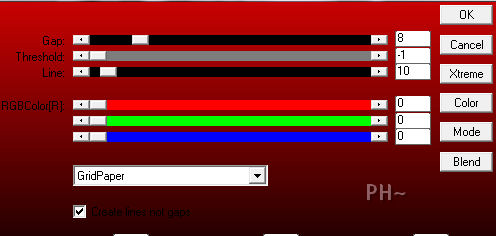
Effects - Plugins - AP01 Lines - Silver Lining - Settings: Drop down GridPaper, 8, -1, 10, 0, 0, 0.
Layer Palette - Set Blend Mode to Multiply, lower opacity to 50.
12) Maximize psppeg_draw_text. Edit - Copy - Close tube - Edit - Paste as a New Layer.
Effects - Image Effects - Offset - Settings:200, -200, transparent.
Effects - 3D Effects - Drop Shadow - Same settings but change Opacity to 75, repeat.
13) Layers - New Raster Layer.
Selections - Load/Save Selections - Load psppeg_ydm2.sel.
Flood fill with white.
Select none.
Effects - Plugins - Eye Candy 5 Impact - Chrome - Settings: Setting Tab - Select Indoor, Platinum. Rest are default settings.
Effects - Distortion Effects - Twirl - Settings: Degrees 700.
Layers Palette - Change Blend Mode to Luminance Legacy and lower opacity to 58.
14) Layers - Merge - Merge All Flatten.
Add your watermark.
Image - Add Borders - 1 pixel symmetric white border.
Image - Add Borders - 5 pixel black border.
Your Done!
Another Example
Home

©PSPPEG 2011
All Rights Reserved