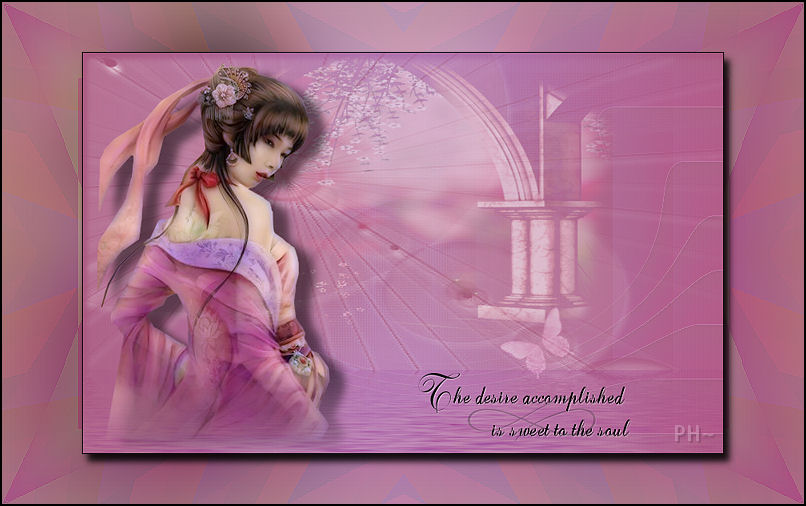
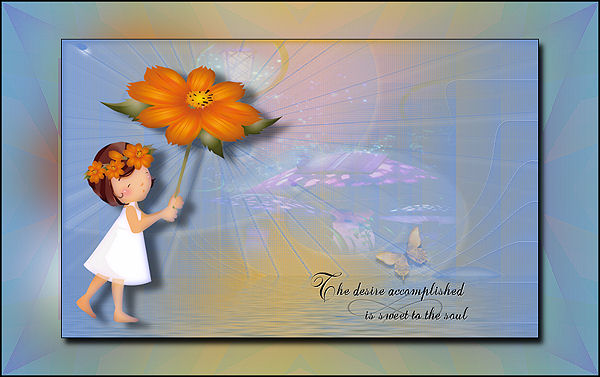
Desire by PsP PeG
|
In this tutorial all layers have subtle changes so that your main tube dominates and your eyes focus on her first, and foremost. This is just one of many artist tricks that are included in PsP Peg Tutorials.
Filters Required:
Toadies
VM Natural
Factory M and P
Xero
Eye Candy 5 Impact
Flaming Pear Flood
------------------------
Tubes Required:
Main Tube
Misted Scenery
Butterfly
Text
------------------------
or use the Ones Used Here
------------------------
Which include:
GINATUBE_FEMME_1841 which can be found Here
The following were found during online travels, the rest were made by PsP PeG
psppeg_descol.psp
Mask Nik-GammaRays.jpg
psppeg_destext.psp
psppegbutterfly.psp
|
Preparation:
Open all tubes and masks in your psp program and minimize.
Select two colors from your main tube. We used #a9577d foreground, #b27ec0 background.
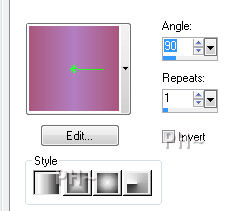
Set your foreground to gradient, foreground/background, Angle 90, Repeat 1, Style Linear.
File, New Image, 800wx500h, transparent.
Flood Fill
Lets Begin:
1) Effects, Reflection Effects, Feedback.
Effects, Plugins, Filter Factory M, Loom.Settings 37,37.

Selections tool, Selection, Rectangle, Custom Selection, Top 0, Left 660, Right 800, Bottom 500.

2) Selections, Promote Selection to Layer. Selections, Select None. Effects, Plugins Effects, Toadies, Plain Mosaic Blur.
Settings: Cell Width 148, Cell Height 35, Cell Edges On/Off 82.

Effects, Distortion Effects, Twirl. Degrees 720.Effects, Edge Effects, Enhance. On your Layers Palette, Change the Blend Mode to Hard Light and lower the opacity to 38.
Effects, 3D Effects, Drop Shadow. 0,0,25,8, black.

3) Layer, New Raster Layer. Flood fill with your color, we used #a9577d.Layers, New Mask Layer, From Image. Find Nik-GammaRays.jpg. Only Source Luminance selected. Apply. Effects, Edge Effects, Enhance. Layers, Merge, Merge Group.
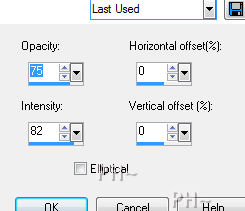
Effects, Plugin Effects, Eye Candy 5 Impact, Perspective Shadow. On your Settings Tab, select Drop Shadow, Low. On the Basic Tab change the color from Black to White. Apply.
Effects, Plugin Effects, Flaming Pear, Flood.Select the color and change it from black to 800080. Increase the top tab, Horizon to 80.

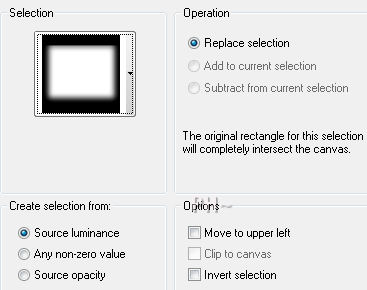
4) Layer, New Raster Layer. Selections, Load Save Selections, Load Selection From Disk, Load psppegds1. Create Selection Source luminance checked, Operation Replace Selection Checked, all others left unchecked.
Maximize psppeg_descol.psp. Edit copy, close. On your working image, Edit paste into selection. Selections, select none. On your Layers Palette Reduce opacity to 50 and change Blend Mode to Lighten. Layers, Merge Visable.
5)Maximize GINATUBE_FEMME_1841. Edit copy, close. Edit Paste as a New Layer on your working canvas. Move to the left. Effects, 3D Effects, Drop Shadow. 10,20,50,15.
Effects, Plugins, Xero, Porcelain, Use Default Settings.

6) Maximize psppegbutterfly.psp. Edit copy, close tube. Edit paste as a New Layer. Position bottom right, under the column.
7) Maximize psppeg_destext.psp. Edit copy, close tube. Edit paste as a New Layer on your working image and move below your butterfly. Effects, 3D Effects, Drop Shadow. 1,1,50,1. Shadow color white.
8) Layers, Merge Visable. Edit, Copy. Image, Add Borders, add a 1 pixel symmetric border in black. Layers, Promote Background Layer.
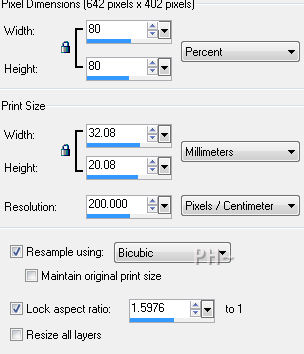
Image, Resize, 80%, All Layers unchecked.Adjust, Sharpen, Sharpen.
9) Layers, New Raster Layer. Selections, Select All. Edit Paste Into Selection. Adjust Blur, Gaussian Blur, 38 radius. Select None. Layers, Arrange, Send to Bottom.
Layers, Duplicate. Effects, Plugins, Filter Factor P, Frame 3. Default Settings. In your Layers Palette, change the Blend Mode to Soft Light and lower the Opacity to 40. Effects, Edge Effects, Enhance.
10) Select the top layer. Effects, Plugins, Eye Candy 5, Impact, Perspective Shadow.On the Settings Tab select Drop Shadow, Low.
11) Layers, Merge All Flaten. Image, Add Borders add a 2 pixel symmetric black border.
Add your watermark. Your Done.
A Different Take on the Same Tutorial
Home
©PSPPEG 2011
All Rights Reserved